Halloween at our place has always been a bit… chaotic. Think glitter, cobwebs, and that one year the fog machine set off the smoke detector five times. Honestly, it’s my favorite kind of chaos! Amidst all that glorious mess, I remember trying to find something truly fun and edible that wasn’t just candy. One year, after a particularly disastrous attempt at a pumpkin-shaped pizza (don’t ask), I stumbled upon the idea of shaping mashed potatoes. It felt like a lightbulb moment! The smells of roasted potatoes and a hint of garlic instantly set a festive, spooky mood. I didn’t expect that these Irresistible Skull Potato Bites would become such a hit, but here we are!
My first go at shaping these skull potato bites was hilarious. I had this elaborate vision, you know? But the potatoes were a tad too warm, and I ended up with what looked more like lumpy alien heads than skulls. My dog, Buster, looked at me like, “Mom, what even IS that?” It was a mess, but we laughed, and I learned a lot about potato consistency that day. Now, I’ve got it down to a science, mostly!

Irresistible Skull Potato Bites: Ingredients
Base Ingredients
- Russet Potatoes (about 2 lbs): These are your best friend for a fluffy, starchy mash. Honestly, other potatoes just don’t get that same creamy texture that holds its shape. Don’t even think about waxy ones, trust me on this!
- Unsalted Butter (4 tbsp): Adds richness and flavor. I always use unsalted so I can control the salt content myself. A good quality butter makes a huge difference, don’t skimp here!
Whole Milk or Half-and-Half (1/2 cup): For that creamy, dreamy texture. I tried almond milk once, and it worked… kinda, but the richness just wasn’t there. Whole milk is the way to go for these skull potato bites.
All-Purpose Flour (2 tbsp): This little secret ingredient helps bind the mash, making it easier to shape and giving it a slightly crispier exterior when baked. I completely forgot it once, and my skulls were… well, less skull-like.
Flavor Boosters
- Garlic Powder (1 tsp): Because everything is better with garlic, right? I’m a big fan of a generous sprinkle, sometimes I even go for 1.5 tsp. Fresh garlic can add too much moisture, so powder is king here.
- Onion Powder (1/2 tsp): Complements the garlic beautifully, adding an extra layer of savory depth. It’s subtle but essential for that comforting flavor profile.
Salt (to taste): Crucial for bringing out all the flavors. I usually start with 1 tsp and adjust. Always taste your mash before shaping!
Black Pepper (1/2 tsp): A little kick, nothing too wild. Freshly ground is always my quirky preference, you can really smell the difference!
Finishing Touches & Optional Extras
- Olive Oil (for brushing): Helps achieve that gorgeous golden-brown crispness. I always brush generously, it’s key for the texture.
- Red Food Coloring (optional, for “blood” effect): If you’re feeling extra spooky, a tiny drop mixed with a bit of water can be brushed on for a creepy touch. I didn’t expect it to look so real!
Crafting Your Irresistible Skull Potato Bites: Instructions
- Prep the Potatoes for Skull Potato Bites:
- First things first, get those russet potatoes peeled and cut into roughly 1-inch chunks. This helps them cook evenly. Toss them into a large pot, cover with cold water by about an inch, and add a generous pinch of salt this is where I always forget to salt the water, and it makes a huge difference in flavor! Bring it to a boil, then reduce heat and simmer until fork-tender, about 15-20 minutes. You want them soft, but not mushy, you know? Drain them really well, excess water is the enemy of a good mash for skull potato bites!
- Mash and Mix Your Skull Potato Bites Base:
- Return the drained potatoes to the hot pot. Add the butter, milk/half-and-half, garlic powder, onion powder, salt, and pepper. Grab your potato masher (or a fork, if you’re like me and can never find the masher when you need it!) and mash until smooth. Now, here’s the crucial part for your skull potato bites: stir in the all-purpose flour. This is your binding agent. Mix it until just combined, don’t overmix, or your potatoes can get gummy. You’re looking for a thick, pliable mash that holds its shape. If it’s too wet, put it back on low heat for a minute or two to dry out a bit, stirring constantly.
- Cool and Shape Your Skull Potato Bites:
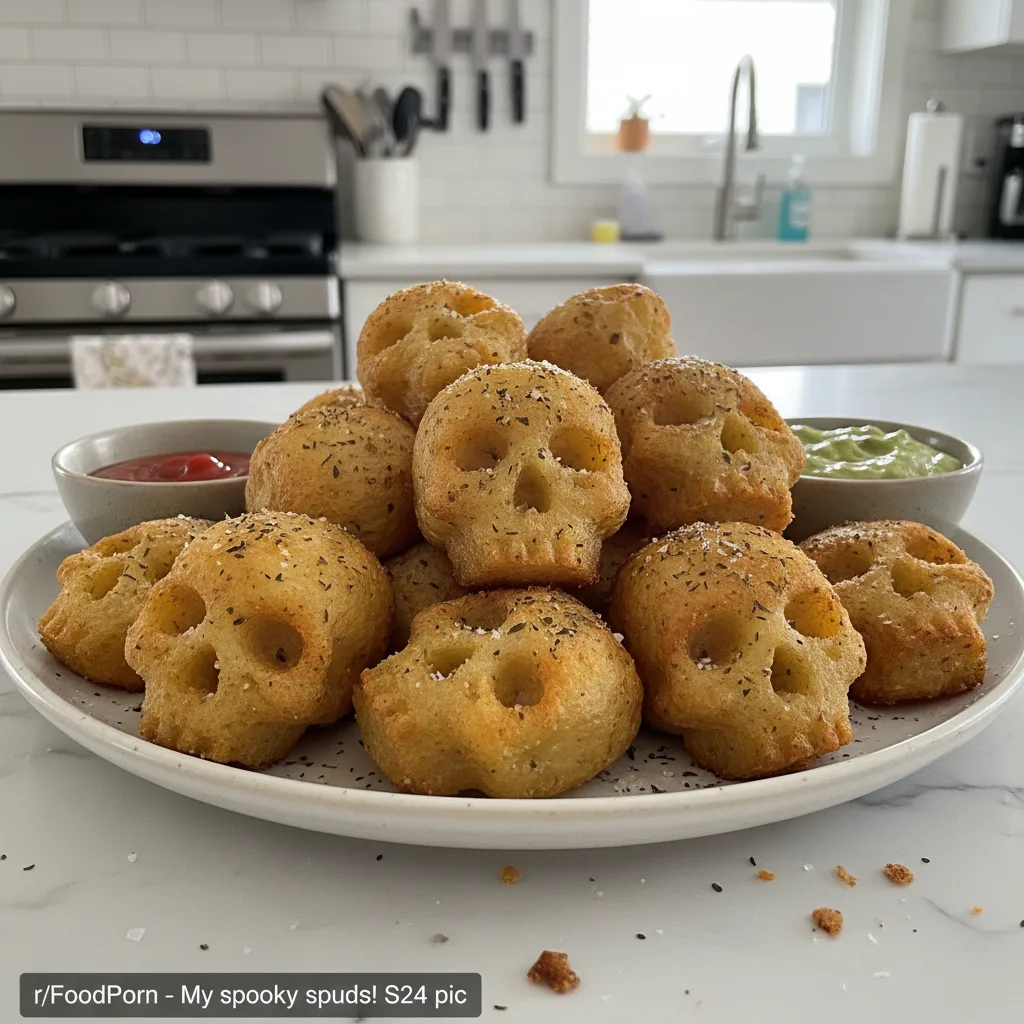
- Let the mashed potato mixture cool down a bit honestly, trying to shape hot mash is an “oops” waiting to happen. Once it’s cool enough to handle, scoop out about 2 tablespoons for each skull. Gently mold it into an oval shape, then use your fingers or a small knife to gently indent eye sockets and a nose hole. For the teeth, I just use the side of a fork to make small horizontal lines. Don’t worry if they’re not perfect, mine never are! Every wonky skull has its own spooky charm. Place your Irresistible Skull Potato Bites on a parchment-lined baking sheet.
- Bake Your Irresistible Skull Potato Bites:
- Preheat your oven to 400°F (200°C). Lightly brush each skull potato bite with olive oil. This is key for that beautiful golden crisp. Pop them into the preheated oven and bake for 20-25 minutes, or until they’re golden brown and crispy on the outside. I usually flip them halfway through to ensure even browning I forgot once, and one side was pale and sad. You want them looking delightfully creepy and delicious!
- Add Spooky Details (Optional) to Your Skull Potato Bites:
- If you’re going for the full creepy effect, this is where the red food coloring comes in. Mix a tiny drop with a few drops of water in a small bowl. Using a clean, thin paintbrush (or even a toothpick), carefully dab or brush a little “blood” around the eyes or mouth of your skull potato bites. It sounds wild, but it really elevates the spooky factor! My kids went wild for this touch last year, honestly.
- Serve Your Spooky Skull Potato Bites:
- Once they’re out of the oven, let your Irresistible Skull Potato Bites cool for just a couple of minutes. They’ll be hot! Arrange them on a platter, maybe with some fake cobwebs or spooky decorations for extra flair. They should be crispy on the outside, fluffy and savory on the inside. They look spooky, yes, but they taste like pure comfort. Enjoy your creepy, delicious creation!
Making these skull potato bites always brings a smile to my face, even when the kitchen turns into a flour-dusted war zone. There’s something so satisfying about seeing those little creepy faces emerge from a humble potato. One time, I accidentally dropped a whole tray right before the party started. Total disaster! But we just scooped them up, reshaped the best we could, and called them “zombie skulls.” Nobody even noticed, haha!
Irresistible Skull Potato Bites: Storage Tips
So, you’ve got leftover Irresistible Skull Potato Bites? Lucky you! They actually store pretty well, which is a win in my book. Pop them into an airtight container and keep them in the fridge for up to 3-4 days. Now, here’s my honest advice: I microwaved them once, and while they were edible, that lovely crispiness was totally gone they turned a bit soft and sad. So, don’t do that lol. For the best reheat, I recommend popping them back into the oven or an air fryer at 350°F (175°C) for about 10-15 minutes, or until heated through and crispy again. They might not be quite as crunchy as fresh out of the oven, but they’ll still be delicious. You can also make the mashed potato mixture a day ahead, store it in the fridge, and then shape and bake when ready. That’s my usual trick for party prep!

Irresistible Skull Potato Bites: Ingredient Substitutions
I’ve played around with these Irresistible Skull Potato Bites quite a bit, so I have a few suggestions if you’re missing an ingredient or just want to experiment. For the potatoes, Yukon Golds can work if you don’t have russets, but they’ll yield a slightly less fluffy mash, I tried it once, and it was okay, but not my favorite. If you’re out of whole milk, any plant-based milk like oat or soy can be used, but honestly, the richness will be a bit different. I’ve even subbed a tablespoon of cream cheese for some of the butter and milk for extra tang and creaminess it worked surprisingly well! For the seasonings, feel free to play around. A pinch of smoked paprika adds a lovely depth, or a touch of cayenne for a subtle heat. Don’t be afraid to make these skull potato bites your own!
Irresistible Skull Potato Bites: Serving Suggestions
These Irresistible Skull Potato Bites are so versatile for Halloween! I love serving them with a side of “bloody” ketchup (just a few drops of red food coloring mixed in, shhh!). A creamy dill dip or a spicy sriracha mayo also works wonderfully. For a full spooky spread, I pair them with mini “mummy” hot dogs and some “graveyard” taco dip. A crisp, tart apple cider or a spooky mocktail (think cranberry juice and sparkling water with gummy worms!) would be the perfect drink. Honestly, these skull potato bites and a classic horror movie on a chilly Halloween night? Yes please! They’re great as an appetizer or even a fun side dish for a casual Halloween dinner.
Cultural Backstory
While skull shapes in food aren’t exactly a centuries-old tradition for potatoes, the spirit of these Irresistible Skull Potato Bites definitely taps into the fun, playful, and sometimes macabre side of Halloween. Halloween itself has ancient roots in Celtic harvest festivals and traditions honoring the dead, evolving into the costume-wearing, candy-collecting holiday we know today. For me, creating spooky-themed food like these skull potato bites is a way to celebrate that playful spirit, embracing the creepy and the delicious all at once. It’s about making memories and adding a personal, creative touch to a holiday that’s all about imagination and a little bit of delightful fright. It’s my small contribution to the magic of the season!
Seeing these Irresistible Skull Potato Bites on the table, all golden and spooky, makes all the kitchen chaos worth it. They’re more than just a snack, they’re a little piece of Halloween joy, a reminder of silly mistakes and happy memories. I hope you give them a try and make your own wonderfully creepy creations. Don’t forget to share your skull potato bites masterpieces with me!

Frequently Asked Questions
- → Can I make the potato mash for Irresistible Skull Potato Bites ahead of time?
Absolutely! I do this often. Just make your mash, let it cool completely, then cover it tightly and refrigerate for up to a day. When you’re ready, let it come to room temp a bit before shaping, it makes it much easier.
- → What if my skull potato bites mash is too sticky to shape?
This happens! If your mash feels too wet or sticky, pop it back into the pot over low heat for a few minutes, stirring constantly, to help some of the moisture evaporate. Adding a tiny bit more flour can also help, but go easy!
- → How do I get the skull shapes just right?
Honestly, practice makes perfect, but don’t stress about perfection! I use my fingers to mold an oval, then a small knife or a chopstick to poke in eye sockets and a nose. For teeth, a fork works wonders. Embrace the imperfect, unique skull potato bites!
- → Can I freeze these Irresistible Skull Potato Bites?
You can! After shaping, you can freeze them raw on a baking sheet until solid, then transfer to a freezer bag for up to a month. Bake from frozen, adding about 10-15 minutes to the cooking time. They’re still yummy!
- → What’s a good vegan substitute for butter and milk in skull potato bites?
For a vegan version, use a good quality plant-based butter (like Miyoko’s or Earth Balance) and unsweetened, unflavored plant milk (oat or soy works best for creaminess). The texture will be slightly different, but still delicious for your skull potato bites!

Crispy Skull Potato Bites: Spooky Halloween Fun
- Prep Time: 30 Minutes
- Cook Time: 25 Minutes
- Total Time: 55 Minutes
- Yield: 8 Servings
- Category: Healthy Drinks
Description
Skull Potato Bites for Halloween: Your party needs these! Get my easy recipe for crispy, savory potato skulls – a creepy, fun treat everyone will love.
Ingredients
- Base Ingredients:
- Russet Potatoes (about 2 lbs)
- Unsalted Butter (4 tbsp)
- Whole Milk or Half-and-Half (1/2 cup)
- All-Purpose Flour (2 tbsp)
- Flavor Boosters:
- Garlic Powder (1 tsp)
- Onion Powder (1/2 tsp)
- Salt (to taste)
- Black Pepper (1/2 tsp)
- Finishing Touches & Optional Extras:
- Olive Oil (for brushing)
- Red Food Coloring (optional, for “blood” effect)
Instructions
- Prep the Potatoes for Skull Potato Bites:: First things first, get those russet potatoes peeled and cut into roughly 1-inch chunks. This helps them cook evenly. Toss them into a large pot, cover with cold water by about an inch, and add a generous pinch of salt – this is where I always forget to salt the water, and it makes a huge difference in flavor! Bring it to a boil, then reduce heat and simmer until fork-tender, about 15-20 minutes. You want them soft, but not mushy, you know? Drain them really well; excess water is the enemy of a good mash for skull potato bites!
- Mash and Mix Your Skull Potato Bites Base:: Return the drained potatoes to the hot pot. Add the butter, milk/half-and-half, garlic powder, onion powder, salt, and pepper. Grab your potato masher (or a fork, if you’re like me and can never find the masher when you need it!) and mash until smooth. Now, here’s the crucial part for your skull potato bites: stir in the all-purpose flour. This is your binding agent. Mix it until just combined; don’t overmix, or your potatoes can get gummy. You’re looking for a thick, pliable mash that holds its shape. If it’s too wet, put it back on low heat for a minute or two to dry out a bit, stirring constantly.
- Cool and Shape Your Skull Potato Bites:: Let the mashed potato mixture cool down a bit – honestly, trying to shape hot mash is an “oops” waiting to happen. Once it’s cool enough to handle, scoop out about 2 tablespoons for each skull. Gently mold it into an oval shape, then use your fingers or a small knife to gently indent eye sockets and a nose hole. For the teeth, I just use the side of a fork to make small horizontal lines. Don’t worry if they’re not perfect; mine never are! Every wonky skull has its own spooky charm. Place your Irresistible Skull Potato Bites on a parchment-lined baking sheet.
- Bake Your Irresistible Skull Potato Bites:: Preheat your oven to 400°F (200°C). Lightly brush each skull potato bite with olive oil. This is key for that beautiful golden crisp. Pop them into the preheated oven and bake for 20-25 minutes, or until they’re golden brown and crispy on the outside. I usually flip them halfway through to ensure even browning – I forgot once, and one side was pale and sad. You want them looking delightfully creepy and delicious!
- Add Spooky Details (Optional) to Your Skull Potato Bites:: If you’re going for the full creepy effect, this is where the red food coloring comes in. Mix a tiny drop with a few drops of water in a small bowl. Using a clean, thin paintbrush (or even a toothpick), carefully dab or brush a little “blood” around the eyes or mouth of your skull potato bites. It sounds wild, but it really elevates the spooky factor! My kids went wild for this touch last year, honestly.
- Serve Your Spooky Skull Potato Bites:: Once they’re out of the oven, let your Irresistible Skull Potato Bites cool for just a couple of minutes. They’ll be hot! Arrange them on a platter, maybe with some fake cobwebs or spooky decorations for extra flair. They should be crispy on the outside, fluffy and savory on the inside. They look spooky, yes, but they taste like pure comfort. Enjoy your creepy, delicious creation!


