Honestly, Halloween isn’t just for candy. I remember one year, my little nephew, bless his heart, declared he was “too old for trick-or-treating” but still wanted a “scary feast.” That’s when I dug through my old recipe cards, thinking about what classic dish I could twist into something wonderfully weird. Deviled eggs, a family reunion staple, popped into my head. The idea of transforming those creamy, savory bites into little, staring eyeballs? Oh, the sheer delight! It felt like a mad scientist’s kitchen experiment, but a delicious one. The first batch of Creepy Eyeball Deviled Eggs was a messy, glorious success, and now they’re a must-have for our spooky celebrations.
I still laugh thinking about the first time I tried piping the yolk mixture. My piping bag, ahem, exploded a little, leaving a creamy, yellowish mess all over the counter. My dog, bless his opportunistic heart, thought it was a personal invitation to a snack. It was pure kitchen chaos, but honestly, it made the final, perfectly piped Creepy Eyeball Deviled Eggs even more satisfying. You live, you learn, you clean up yolk from the floor!

Ingredients for Your Creepy Eyeball Deviled Eggs
Base Ingredients
- Large Eggs (12): The canvas for our culinary fright! I always grab a dozen, sometimes one or two crack during boiling, and it’s nice to have backup. Plus, you’ll want plenty of Creepy Eyeball Deviled Eggs.
- Mayonnaise (1/2 cup): This is the creamy heart of the filling. Don’t skimp on quality here, a good, full-fat mayo makes all the difference. I tried a lighter version once, and it just didn’t have that rich, satisfying mouthfeel.
- Dijon Mustard (1 tbsp): Just a little kick! It balances the richness of the mayo and yolk. I prefer Dijon for its subtle spice, but a touch of yellow mustard works too. Less is more here, you don’t want it overpowering your Creepy Eyeball Deviled Eggs.
- White Vinegar or Pickle Juice (1 tsp): That tiny splash of acidity brightens everything up. I often use pickle juice if I have some leftover, it adds a bonus layer of savory tang that I find absolutely delightful.
Eyeball Details
- Black Olives (12-24, pitted): These are crucial for the “iris” of our creepy eyeballs. You’ll want to slice them into rings for the perfect look. I always buy extra, because, let’s be real, I snack on them while I work.
- Red Food Coloring or Sriracha (a few drops): This is for those gruesome “bloodshot” veins. Food coloring works great, but if you like a little heat, a tiny swirl of Sriracha on the whites adds a surprising zing and a lovely reddish hue.
Seasonings & Optional Frights
- Salt and Black Pepper (to taste): Essential for seasoning! Start with a pinch, then taste and adjust. I’m a big believer in seasoning as you go, especially with something like deviled eggs.
- Paprika (for dusting, optional): A classic deviled egg garnish, but for these Creepy Eyeball Deviled Eggs, it can add a bit of a “diseased” look if you’re going for extra creepiness.
Crafting Your Creepy Eyeball Deviled Eggs
- Boil Those Eggs Just Right:
- First things first, get those eggs perfectly hard-boiled. I place my eggs in a single layer in a pot, cover them with about an inch of cold water, and bring it to a rolling boil. Once boiling, turn off the heat, cover, and let them sit for exactly 12 minutes. This is where I always mess up if I get distracted, overcooked yolks get that greenish ring, which isn’t the look we’re going for with our Creepy Eyeball Deviled Eggs, unless you want them extra zombified, I guess! Immediately transfer them to an ice bath after 12 minutes to stop the cooking.
- Peel with Care, My Friend:
- Once the eggs are cool enough to handle, it’s peeling time. This is where patience is key, hon. Gently tap the egg all over, then roll it on the counter to loosen the shell. Start peeling under cold running water, it helps the shell come off cleaner. I swear, sometimes I feel like I’m performing surgery to get a perfectly smooth egg white, but it’s worth it for our Creepy Eyeball Deviled Eggs. Don’t worry if a few aren’t perfect, those can be your “practice” bites!
- Halve and Scoop:
- Carefully slice each peeled egg in half lengthwise. You’ll see those lovely, firm yolks. Gently scoop out all the yolks into a medium bowl. Try to keep the egg white halves intact, they’re our “eye sockets.” This step always smells so wonderfully eggy and rich. Make sure you get every bit of yolk for the best Creepy Eyeball Deviled Eggs filling!
- Whip Up the Wicked Filling:
- Now for the magic! Mash the yolks with a fork until they’re smooth. Add the mayonnaise, Dijon mustard, white vinegar (or pickle juice!), salt, and pepper. Mix it all together until it’s super creamy and well combined. Taste it! This is your moment to adjust the seasoning. I’m a salt fiend, so I usually add a bit more than I think I need. This creamy mixture is the brain of our Creepy Eyeball Deviled Eggs, so make it tasty!
- Pipe Those Pupils:
- Transfer the yolk mixture to a piping bag fitted with a star tip (or a zip-top bag with the corner snipped off, that’s my usual, less fancy method). Pipe the filling back into the hollows of the egg white halves. Aim for a nice, rounded dome. This part is so satisfying, watching those empty sockets fill up. Don’t worry if it’s not absolutely perfect, the “creepy” look allows for a little imperfection with our Creepy Eyeball Deviled Eggs.
- The Frightful Finishing Touches:
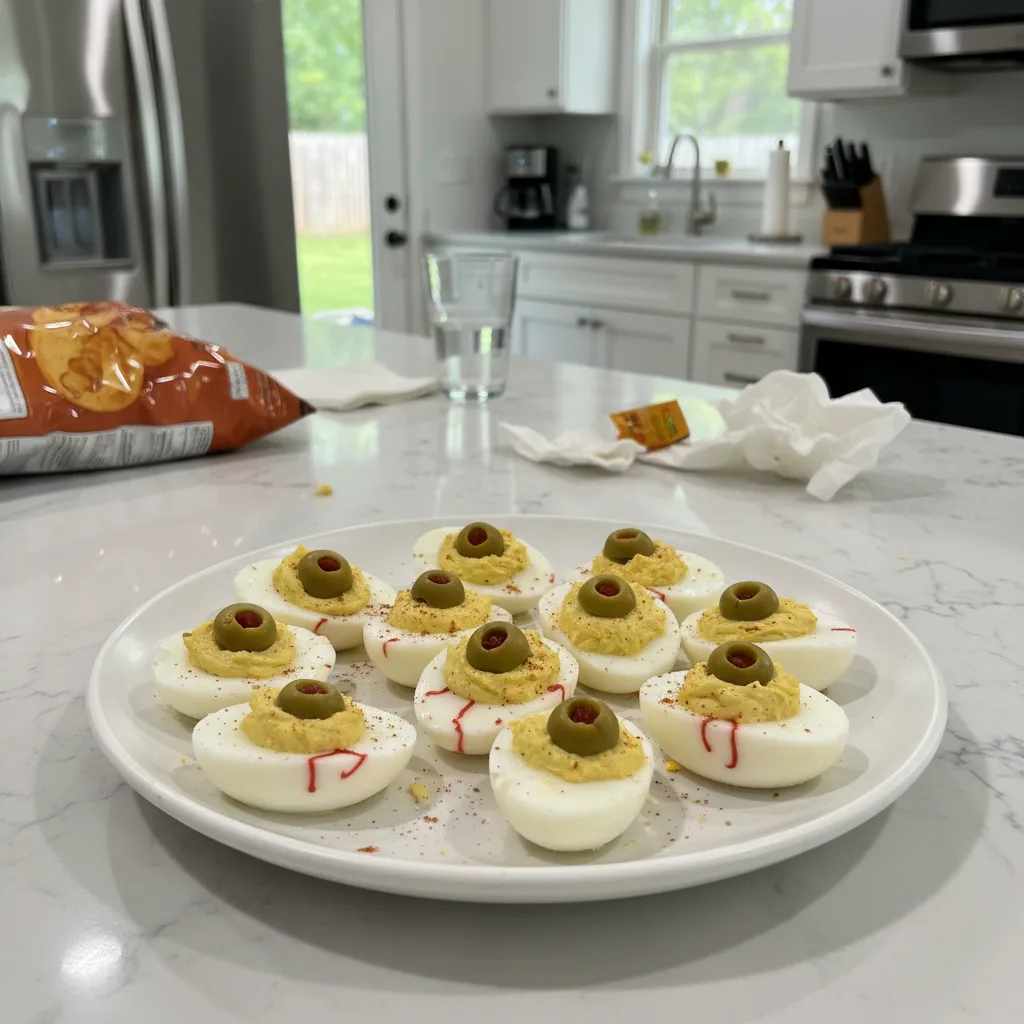
- Time to make them truly creepy! Place an olive slice, cut side down, onto the center of each piped yolk mound this is your iris. Then, for those bloodshot veins, take a toothpick, dip it lightly into red food coloring or Sriracha, and draw squiggly lines radiating from the olive slice onto the egg white. The more irregular, the better, honestly! Arrange your completed Creepy Eyeball Deviled Eggs on a platter and watch the horrified delight on your guests’ faces.
I remember serving these Creepy Eyeball Deviled Eggs at a Halloween potluck once. My friend, who usually avoids anything remotely scary, actually gasped and then promptly ate three. It just goes to show, sometimes a little kitchen chaos and a lot of creativity can turn a simple snack into a memorable, conversation-starting dish. They really are a fun way to get into the spooky spirit.
Storing Your Creepy Eyeball Deviled Eggs
Okay, so these Creepy Eyeball Deviled Eggs are best enjoyed fresh, but if you have leftovers (which, let’s be real, is rare around here!), you can totally store them. I usually pop them into an airtight container and keep them in the fridge. They’ll stay good for about 2-3 days, though the “bloodshot” veins might fade a little over time, which kinda takes away from the creepy factor. I learned the hard way that if you store them uncovered, they’ll pick up all the fridge smells, and nobody wants onion-flavored eyeballs, right? Also, don’t freeze them, the texture gets super weird, and the mayo separates. Just, don’t do that, lol. Keep them chilled and covered for the best spooky snack experience.

Ingredient Substitutions for Creepy Eyeball Deviled Eggs
I’ve played around with these Creepy Eyeball Deviled Eggs quite a bit, so I’ve got some substitution stories for you. If you don’t have Dijon, yellow mustard works fine, but it gives a slightly sharper, less nuanced flavor I tried it once, and it worked, kinda, but Dijon is my preference. No black olives? Green olives can work, but they give a different vibe, maybe not as “creepy” but still tasty. For the “bloodshot” effect, if you’re not into food coloring or Sriracha, a tiny dab of beet juice can give a natural red tint, though it’s a bit harder to control the “veins.” You could also try a sprinkle of smoked paprika for a different color and flavor dimension, although it won’t give you the same eyeball effect. Honestly, experiment! That’s half the fun of making these Creepy Eyeball Deviled Eggs.
Creepy Eyeball Deviled Eggs: Serving Them Up
Serving these Creepy Eyeball Deviled Eggs is almost as fun as making them! They’re the ultimate party appetizer, especially for a Halloween bash. I love arranging them on a dark platter for maximum visual impact, maybe with some fake spiderwebs or plastic spiders scattered around. For drinks, I think a spooky mocktail or even a crisp, dry white wine pairs nicely with the savory richness. As for a side, they’re usually a standalone snack, but if you want to make it a themed spread, think about a “worm” pasta salad (that’s just regular pasta salad with some clever green food coloring) or some “witch finger” breadsticks. Honestly, these Creepy Eyeball Deviled Eggs and a good horror movie? Yes please! They’re perfect for setting a spooky mood.
Cultural Backstory of Deviled Eggs
Deviled eggs, in various forms, have been around for centuries, tracing their roots back to ancient Rome where seasoned boiled eggs were a common appetizer. The “deviled” part of the name came much later, in the 18th century, referring to spicy or highly seasoned food. For me, deviled eggs always evoke memories of family potlucks and holiday gatherings. My grandma, bless her heart, always had a platter of them ready, and they were always the first thing to disappear. Transforming them into Creepy Eyeball Deviled Eggs for Halloween is my way of taking that beloved, comforting tradition and giving it a playful, spooky twist that still feels deeply personal. It’s about making new memories while honoring the old, all with a little bit of frightful fun.
These Creepy Eyeball Deviled Eggs are more than just a snack, they’re a tiny piece of Halloween joy, a little edible art that brings smiles (and maybe a few shivers). They remind me that the best food isn’t always about perfection, but about the fun, the memories, and the shared moments around the kitchen. I really hope you try them and make them your own. Please, if you do, share your creepy creations! I’d love to see how your Creepy Eyeball Deviled Eggs turn out!

Frequently Asked Questions about Creepy Eyeball Deviled Eggs
- → Can I make these Creepy Eyeball Deviled Eggs ahead of time?
You absolutely can! I often boil and peel the eggs, and even make the yolk filling, the day before. Just keep the filling in an airtight container or piping bag in the fridge. Assemble and decorate your Creepy Eyeball Deviled Eggs right before serving for the freshest look and taste.
- → What if I don’t have a piping bag for the yolk filling?
No worries at all! I usually just use a sturdy zip-top bag. Spoon the filling into one corner, snip off a tiny bit of the corner with scissors, and voilà! It works just as well for piping the creamy goodness into your Creepy Eyeball Deviled Eggs.
- → How do I prevent the green ring around the egg yolks?
Ah, the dreaded green ring! The trick is not to overcook your eggs. As soon as they’ve sat for 12 minutes after boiling, plunge them into an ice bath immediately. This stops the cooking process and keeps those yolks beautifully yellow for your Creepy Eyeball Deviled Eggs.
- → Can I use different “vein” colors for my Creepy Eyeball Deviled Eggs?
Of course! While red gives that classic bloodshot look, you could totally use green or even blue food coloring for a more alien or zombie eyeball effect. Get creative! I tried green once, and it was a delightfully gross addition to my Creepy Eyeball Deviled Eggs spread.
- → What’s the best way to get clean olive slices for the pupils?
For the neatest “pupils” on your Creepy Eyeball Deviled Eggs, I like to use pitted black olives and slice them with a sharp paring knife. If you have a small round pastry tip, you can even use that to punch out perfect circles from the olive for an extra precise look.

Creepy Eyeball Deviled Eggs: Spooky Halloween Bites
- Prep Time: 20 Minutes
- Cook Time: 12 Minutes
- Total Time: 35 Minutes
- Yield: 12 Servings
- Category: Easy dinners
Description
Whip up Creepy Eyeball Deviled Eggs for Halloween! These spooky snacks are easy, fun for parties, and a savory hit everyone will scream for. Get the recipe!
Ingredients
- Base Ingredients:
- Large Eggs (12)
- Mayonnaise (1/2 cup)
- Dijon Mustard (1 tbsp)
- White Vinegar or Pickle Juice (1 tsp)
- Eyeball Details:
- Black Olives (12-24, pitted)
- Red Food Coloring or Sriracha (a few drops)
- Seasonings & Optional Frights:
- Salt and Black Pepper (to taste)
- Paprika (for dusting, optional)
Instructions
- Boil Those Eggs Just Right:: First things first, get those eggs perfectly hard-boiled. I place my eggs in a single layer in a pot, cover them with about an inch of cold water, and bring it to a rolling boil. Once boiling, turn off the heat, cover, and let them sit for exactly 12 minutes. This is where I always mess up if I get distracted; overcooked yolks get that greenish ring, which isn’t the look we’re going for with our Creepy Eyeball Deviled Eggs, unless you want them extra zombified, I guess! Immediately transfer them to an ice bath after 12 minutes to stop the cooking.
- Peel with Care, My Friend:: Once the eggs are cool enough to handle, it’s peeling time. This is where patience is key, hon. Gently tap the egg all over, then roll it on the counter to loosen the shell. Start peeling under cold running water; it helps the shell come off cleaner. I swear, sometimes I feel like I’m performing surgery to get a perfectly smooth egg white, but it’s worth it for our Creepy Eyeball Deviled Eggs. Don’t worry if a few aren’t perfect; those can be your “practice” bites!
- Halve and Scoop:: Carefully slice each peeled egg in half lengthwise. You’ll see those lovely, firm yolks. Gently scoop out all the yolks into a medium bowl. Try to keep the egg white halves intact; they’re our “eye sockets.” This step always smells so wonderfully eggy and rich. Make sure you get every bit of yolk for the best Creepy Eyeball Deviled Eggs filling!
- Whip Up the Wicked Filling:: Now for the magic! Mash the yolks with a fork until they’re smooth. Add the mayonnaise, Dijon mustard, white vinegar (or pickle juice!), salt, and pepper. Mix it all together until it’s super creamy and well combined. Taste it! This is your moment to adjust the seasoning. I’m a salt fiend, so I usually add a bit more than I think I need. This creamy mixture is the brain of our Creepy Eyeball Deviled Eggs, so make it tasty!
- Pipe Those Pupils:: Transfer the yolk mixture to a piping bag fitted with a star tip (or a zip-top bag with the corner snipped off; that’s my usual, less fancy method). Pipe the filling back into the hollows of the egg white halves. Aim for a nice, rounded dome. This part is so satisfying, watching those empty sockets fill up. Don’t worry if it’s not absolutely perfect; the “creepy” look allows for a little imperfection with our Creepy Eyeball Deviled Eggs.
- The Frightful Finishing Touches:: Time to make them truly creepy! Place an olive slice, cut side down, onto the center of each piped yolk mound – this is your iris. Then, for those bloodshot veins, take a toothpick, dip it lightly into red food coloring or Sriracha, and draw squiggly lines radiating from the olive slice onto the egg white. The more irregular, the better, honestly! Arrange your completed Creepy Eyeball Deviled Eggs on a platter and watch the horrified delight on your guests’ faces.