Honestly, I remember the first time I tried to make a Key Lime Pie. It was a scorching summer day, and my tiny apartment kitchen felt like a sauna just thinking about turning on the oven. My aunt, bless her heart, always had a classic baked version, but I was craving that tangy zest without the sweat. That’s when I stumbled upon the idea of a No-Bake Key Lime Pie. I was skeptical, like, could it really capture that bright, zesty magic without the fuss? Turns out, yes! This creamy, dreamy dessert became my summer savior, a little slice of sunshine that just makes everything feel lighter. It’s the perfect antidote to a hot day, and frankly, it tastes like vacation.
One time, I was so excited to serve this No-Bake Key Lime Pie at a backyard BBQ, I completely forgot to chill it long enough. Picture this: I sliced into it, and it was… more like a creamy lime soup than a pie. Oops! My guests were good sports, eating it with spoons, but I learned my lesson: patience is key, especially with a no-bake wonder. Now, I always make sure to give it ample fridge time, sometimes even overnight. It makes all the difference, trust me.

Ingredients for Your No-Bake Key Lime Pie
Crust Essentials
- Graham Cracker Crumbs: The base! I swear by the pre-crushed ones when I’m feeling lazy, but smashing whole crackers in a bag is oddly therapeutic. Don’t skimp on the quantity, a sturdy crust is important.
- Unsalted Butter: This is what binds everything together. Melted, of course. Please, for the love of pie, don’t try to use cold butter here. I did once, and it was a crumbly disaster.
Creamy Filling Stars
- Sweetened Condensed Milk: This is the magic ingredient that makes our No-Bake Key Lime Pie filling so rich and creamy. It’s thick, sweet, and reacts with the lime juice to set the pie. I always keep a can or two in the pantry for emergencies!
- Key Lime Juice: The star of the show! Freshly squeezed is always, always best. Bottled can work, but the flavor just isn’t as bright, and honestly, you can taste the difference. I tried a generic brand once, and the pie tasted… off.
- Heavy Cream: Whipped into stiff peaks, this adds lightness and volume to the filling. Don’t use anything less than heavy cream, half-and-half won’t cut it. I learned that the hard way when my pie was too dense.
- Powdered Sugar: Just a touch to sweeten the whipped cream. It dissolves beautifully and keeps the texture smooth, unlike granulated sugar which can be gritty.
Flavor Boosters & Finishes
- Key Lime Zest: So much flavor packed into this! Zest only the green part, the white pith underneath is bitter, and you don’t want that. I love how it smells so fresh and vibrant when I’m grating it.
- Vanilla Extract: A splash just rounds out the flavors. Nothing too crazy, but it adds a little warmth to the tangy lime.
Crafting the Perfect No-Bake Key Lime Pie: Instructions
- Crush and Press the Crust:
- First things first, let’s get that crust going. I usually grab a rolling pin and smash those graham crackers in a Ziploc bag it’s oddly therapeutic, you know? Or, if I’m feeling fancy, the food processor does the trick in seconds. Melt your butter, then mix it into the crumbs until it looks like wet sand. Press it firmly into your pie dish, I always use the bottom of a measuring cup to get it really compact. Don’t skip this part, a flimsy crust is no fun. Pop it in the fridge while you get the filling ready. You want it nice and firm.
- Whip the Cream to Stiff Peaks:
- Now for the fluffy stuff! Get out your electric mixer and pour in that cold heavy cream. Add the powdered sugar and vanilla extract. Start on low, then gradually increase to high speed. Watch it closely, you’re looking for stiff peaks, where the cream holds its shape beautifully. I’ve definitely over-whipped it before, turning it into butter, oops! So, keep an eye on it. This step is where the filling gets its airy texture, so take your time and don’t rush it. It should smell subtly sweet and creamy, honestly.
- Combine the Key Lime Filling:
- In a separate, medium bowl, whisk together the sweetened condensed milk, key lime juice, and a generous amount of key lime zest. You’ll notice it thickens almost immediately that’s the magic happening! The acidity of the lime juice reacts with the condensed milk, creating that classic creamy, dense texture. I always give it a good sniff, that bright, tangy lime aroma is just heavenly. Make sure everything is well combined and smooth, no lumps allowed!
- Gently Fold in the Whipped Cream:
- This is where we bring the two components together. Take about a third of your whipped cream and fold it into the lime mixture to lighten it. Then, gently fold in the remaining whipped cream, being careful not to deflate all that lovely air you just whipped in. You want to maintain that light, airy texture for your No-Bake Key Lime Pie. I’ve been too aggressive before, and the pie ended up a bit too dense. Keep it light and fluffy!
- Fill the Crust and Chill:
- Pour your perfectly creamy No-Bake Key Lime Pie filling into your chilled graham cracker crust. Use a spatula to spread it evenly, making sure to get into all the edges. Then, the hardest part: chilling! Cover the pie loosely with plastic wrap and refrigerate for at least 4-6 hours, or even better, overnight. This is crucial for it to set properly. I know, waiting is tough, but trust me, it’s worth it. That aroma of lime will start to fill your fridge, a promise of deliciousness to come.
- Garnish and Serve Your No-Bake Key Lime Pie:
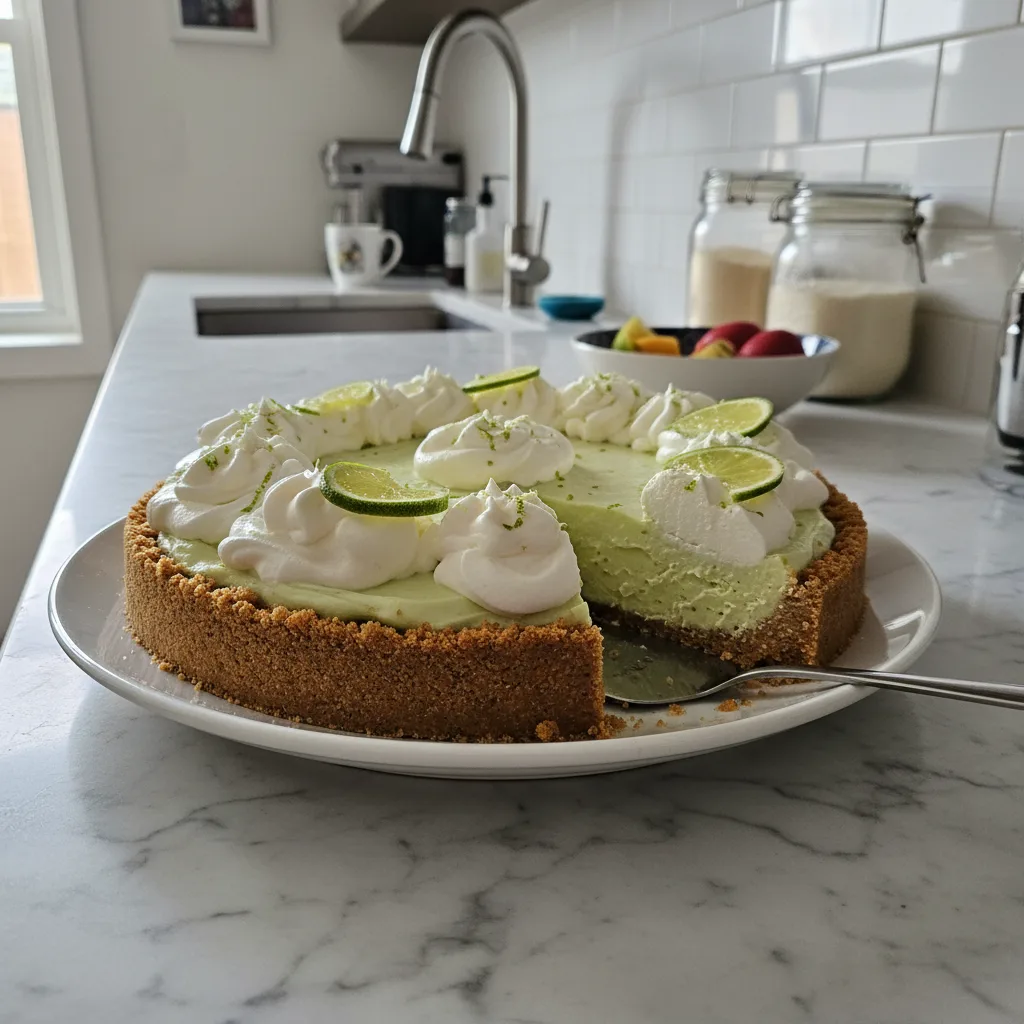
- Once your No-Bake Key Lime Pie is perfectly set and firm, it’s time for the final touches! I love to garnish mine with a dollop of extra whipped cream, a sprinkle of fresh key lime zest, and maybe a few thin slices of lime for a pop of color. It just looks so inviting! Slice it with a sharp, warm knife for clean cuts. The first slice is always the best, a creamy, tangy, sweet bite that just screams summer. Enjoy every single refreshing piece!
Making this No-Bake Key Lime Pie always brings a smile to my face. It’s messy, yes, with crumbs everywhere and lime juice on my apron, but that’s part of the charm, isn’t it? It reminds me of those simple summer moments, sitting on the porch, a cool breeze, and a slice of something bright and tangy. It’s more than just a dessert, it’s a little bit of happiness, honestly.
Storing Your No-Bake Key Lime Pie
This No-Bake Key Lime Pie holds up beautifully in the fridge for about 3-4 days, covered loosely with plastic wrap. I’ve made the mistake of trying to cover it too tightly once, and the condensation made the top a bit watery, so don’t do that lol. If you’ve got leftovers (which is rare in my house!), you can also freeze individual slices. Just wrap them tightly in plastic wrap, then foil, and they’ll be good for up to a month. When you want a quick treat, just pull a slice out and let it thaw in the fridge for a couple of hours, or on the counter for about 15-20 minutes. It’s almost as good as fresh, I swear, especially when you’re craving something cool!

No-Bake Key Lime Pie Ingredient Swaps
Life happens, and sometimes you don’t have exactly what the recipe calls for. For the graham cracker crust, I’ve successfully swapped in shortbread cookies or even vanilla wafers, crushed up the same way. The flavor profile changes a bit, but it’s still delicious, just a different kind of sweet. No key limes? Regular lime juice works, but you might need a tiny bit less since it’s more tart, and perhaps add a bit more zest for that intense lime aroma. I’ve used it in a pinch, and it was still delicious, just a slightly different vibe. If you’re out of heavy cream, full-fat coconut cream (chilled, then scoop out the thick part) can make a surprisingly good, dairy-free version, though it might have a faint coconut flavor. I tried that once for a friend with dietary restrictions, and it worked, kinda, but it’s not quite the same texture.
Serving Your No-Bake Key Lime Pie
This No-Bake Key Lime Pie is a star all on its own, but it really shines with a few thoughtful pairings. For drinks, I love serving it with a chilled glass of sparkling water infused with mint and a slice of lime super refreshing. Or, for an adults-only treat, a crisp rosé or a light sauvignon blanc complements the tanginess beautifully. This pie and a cheesy rom-com? Yes please, that’s my ideal Friday night! It’s also amazing after a light summer meal, like grilled chicken or a big salad. The cool, creamy texture is a welcome contrast to savory dishes. Sometimes, I even crumble a few extra graham crackers on top for added texture right before serving, it just gives it that little extra something.
The Story Behind No-Bake Key Lime Pie
The original Key Lime Pie is steeped in Florida Keys history, a dessert born from necessity and local ingredients. Fishermen and spongers needed a dessert that didn’t require an oven on their boats, and the acidity of key limes naturally curdled the sweetened condensed milk. My own discovery of the no-bake version felt like a continuation of that clever, practical spirit. It wasn’t some grand culinary revelation, just a simple desire to enjoy that incredible tangy-sweet flavor without heating up my already sweltering kitchen. It became special to me because it embodied ease and pure summer joy, a reminder that sometimes the simplest solutions are the most delicious. It’s a little piece of that relaxed, sunshine-soaked Florida vibe, brought right into my kitchen, no matter the weather outside.
So there you have it, my beloved No-Bake Key Lime Pie. It’s a little slice of sunshine, a taste of summer, and a testament to the fact that delicious doesn’t always mean complicated. I love how it turned out, perfectly tangy and so creamy, just like those first few times I made it. I hope you give it a whirl and maybe even share your own kitchen chaos moments with me. Happy no-baking, friends!

Frequently Asked Questions About No-Bake Key Lime Pie
- → Can I make this No-Bake Key Lime Pie ahead of time?
Absolutely! This pie is a champion for make-ahead desserts. I often whip it up the night before a gathering, and it’s even better after a full night in the fridge. The flavors meld, and it sets perfectly. It’s such a relief to have dessert sorted!
- → What if I can’t find key limes for this No-Bake Key Lime Pie?
No key limes? No problem, hon! You can totally use regular lime juice. The flavor will be a bit different, a little less floral and more intensely tart, but it still makes a delicious pie. I’ve done it many times, and it’s always a hit.
- → My No-Bake Key Lime Pie filling isn’t setting, what went wrong?
Oh, I’ve been there! Usually, it means it didn’t chill long enough, or perhaps the heavy cream wasn’t whipped to stiff peaks. Make sure your ingredients are cold, and give it ample time in the fridge like, overnight if you can. Patience is truly a virtue here!
- → How long does No-Bake Key Lime Pie last in the fridge?
This creamy No-Bake Key Lime Pie keeps well in the fridge for about 3-4 days, covered loosely. I wouldn’t push it much past that, as the crust can start to get a bit soft. I usually slice off what I need and keep the rest covered.
- → Can I add other flavors to this No-Bake Key Lime Pie?
Totally! I’ve experimented with adding a touch of coconut extract to the filling for a tropical twist, or even a thin layer of raspberry jam on the crust before adding the filling. It’s your pie, have fun with it! Just be gentle with the ratios.

Creamy No-Bake Key Lime Pie: My Quick Summer Treat
- Prep Time: 20 Minutes
- Cook Time: 0 Minutes
- Total Time: 4 Hours 20 Minutes
- Yield: 8 Servings 1x
- Category: Low Carbs Meals
Description
Whip up this easy No-Bake Key Lime Pie! Tangy, sweet, and perfectly creamy, it’s my simple secret for a refreshing dessert without turning on the oven.
Ingredients
- Crust Essentials:
- 1 ½ cups (about 10–12 full sheets) graham cracker crumbs
- ⅓ cup unsalted butter, melted
- Creamy Filling Stars:
- 1 (14-ounce) can sweetened condensed milk
- ½ cup freshly squeezed key lime juice (about 8–10 key limes)
- 1 ½ cups cold heavy cream
- ¼ cup powdered sugar
- Flavor Boosters & Finishes:
- 1 tablespoon key lime zest (from about 2–3 key limes)
- ½ teaspoon vanilla extract
Instructions
- Crush and Press the Crust:: First things first, let’s get that crust going. I usually grab a rolling pin and smash those graham crackers in a Ziploc bag—it’s oddly therapeutic, you know? Or, if I’m feeling fancy, the food processor does the trick in seconds. Melt your butter, then mix it into the crumbs until it looks like wet sand. Press it firmly into your pie dish; I always use the bottom of a measuring cup to get it really compact. Don’t skip this part; a flimsy crust is no fun. Pop it in the fridge while you get the filling ready. You want it nice and firm.
- Whip the Cream to Stiff Peaks:: Now for the fluffy stuff! Get out your electric mixer and pour in that cold heavy cream. Add the powdered sugar and vanilla extract. Start on low, then gradually increase to high speed. Watch it closely; you’re looking for stiff peaks, where the cream holds its shape beautifully. I’ve definitely over-whipped it before, turning it into butter, oops! So, keep an eye on it. This step is where the filling gets its airy texture, so take your time and don’t rush it. It should smell subtly sweet and creamy, honestly.
- Combine the Key Lime Filling:: In a separate, medium bowl, whisk together the sweetened condensed milk, key lime juice, and a generous amount of key lime zest. You’ll notice it thickens almost immediately—that’s the magic happening! The acidity of the lime juice reacts with the condensed milk, creating that classic creamy, dense texture. I always give it a good sniff; that bright, tangy lime aroma is just heavenly. Make sure everything is well combined and smooth, no lumps allowed!
- Gently Fold in the Whipped Cream:: This is where we bring the two components together. Take about a third of your whipped cream and fold it into the lime mixture to lighten it. Then, gently fold in the remaining whipped cream, being careful not to deflate all that lovely air you just whipped in. You want to maintain that light, airy texture for your No-Bake Key Lime Pie. I’ve been too aggressive before, and the pie ended up a bit too dense. Keep it light and fluffy!
- Fill the Crust and Chill:: Pour your perfectly creamy No-Bake Key Lime Pie filling into your chilled graham cracker crust. Use a spatula to spread it evenly, making sure to get into all the edges. Then, the hardest part: chilling! Cover the pie loosely with plastic wrap and refrigerate for at least 4-6 hours, or even better, overnight. This is crucial for it to set properly. I know, waiting is tough, but trust me, it’s worth it. That aroma of lime will start to fill your fridge, a promise of deliciousness to come.
- Garnish and Serve Your No-Bake Key Lime Pie:: Once your No-Bake Key Lime Pie is perfectly set and firm, it’s time for the final touches! I love to garnish mine with a dollop of extra whipped cream, a sprinkle of fresh key lime zest, and maybe a few thin slices of lime for a pop of color. It just looks so inviting! Slice it with a sharp, warm knife for clean cuts. The first slice is always the best; a creamy, tangy, sweet bite that just screams summer. Enjoy every single refreshing piece!


