Honestly, some weeknights just hit different, right? I remember one particularly wild Tuesday, the kind where the kids were doing gymnastics off the couch and I was staring into the fridge, wondering if a jar of pickles counted as dinner. That’s when the idea for these quick easy crispy Parmesan chicken wraps just… sparked. I was trying to recreate a dish I had ages ago, but with less fuss and more “get it on the table now” energy. The first attempt? A total mess, chicken breading everywhere, a little too much oil smoke, oops! But the taste, even then, promised something good. Now, this recipe has become a staple, bringing that comforting crunch and cheesy goodness to our dinner table without the pickle-jar despair.
Oh, the first time I made these crispy Parmesan chicken wraps for a small get-together, I completely forgot to season the flour. I was so proud of my breading station, all neat and orderly, then I took that first bite of chicken and thought, “Hmm, something’s missing.” My husband, bless his heart, just said, “It’s… subtle?” We all had a good laugh, and I quickly brought out the salt shaker. To be real, kitchen blunders happen, but they often make the best stories, don’t they?

Ingredients for Crispy Parmesan Chicken Wraps
- Boneless, Skinless Chicken Breasts: We’re going for lean and quick here! I usually slice them thin myself, about 1/2-inch, to ensure they cook fast and get super crispy. Honestly, thicker pieces just don’t have the same crunch-to-meat ratio, and who wants a soggy chicken wrap?
- Large Flour Tortillas: These are the vehicle for all that goodness. Don’t go for anything too small, you need room to wrap! I’ve tried corn tortillas once, and let’s just say it was a structural integrity nightmare. Stick to flour, hon.
Grated Parmesan Cheese: The star of the show for that savory, nutty crust. Please, for the love of all that is delicious, use freshly grated if you can. The pre-shredded stuff works in a pinch, but the flavor just isn’t as vibrant. I swear by it!
Panko Breadcrumbs: These are non-negotiable for that epic crispiness. Regular breadcrumbs just don’t deliver the same satisfying crunch. I tried regular once when I ran out of Panko, and it was… fine. But Panko is where the magic happens, trust me on this.
All-Purpose Flour: This is our first layer for the breading, helping everything stick. I once used almond flour, and it absorbed way too much moisture, making the chicken a bit gummy. Stick to good old AP flour for the best results, it’s reliable.
- Large Eggs: Our binding agent! Two should be enough, whisked well. Don’t skimp, you need enough to coat the chicken thoroughly. I once cracked a shell in there, oops, had to fish it out carefully!
- Garlic Powder & Onion Powder: These are the unsung heroes of flavor, adding that savory depth to the breading. I always add a little extra, because, well, garlic and onion make everything better, right?
- Smoked Paprika: For a hint of color and a lovely, subtle smoky warmth. It’s not overpowering, just a little something extra that makes you go “mmm.” I sometimes get carried away and add too much, and then my chicken is a bit too orange, haha.
- Salt & Black Pepper: The basics, but so important! Season your chicken, season your flour mixture. Don’t be shy, but don’t overdo it either. I always taste a tiny bit of the breading mixture (before adding chicken, obviously!) to check the seasoning.
- Olive Oil: For frying that chicken to golden perfection. I usually use extra virgin, but honestly, any good frying oil works. Just make sure you have enough to coat the bottom of your pan generously.
- Shredded Lettuce & Diced Tomatoes: For that fresh, crisp contrast in the wraps. I usually just grab a bag of pre-shredded romaine because, let’s be real, convenience.
- Ranch or Caesar Dressing: Your choice! I’m a ranch girl, but my partner loves Caesar. Use whatever makes your heart sing. Sometimes I even mix a little hot sauce into my ranch for an extra kick!
- Fresh Parsley (optional): A little sprinkle at the end just brightens everything up and makes it look fancy, even if it’s just a quick dinner.
Making Your Crispy Parmesan Chicken Wraps
- Prep Your Chicken & Breading Stations:
- First things first, let’s get organized! Take those chicken breasts and slice them into thin cutlets, about 1/2-inch thick. If they’re too thick, they won’t get as crispy, and who wants that? Now, set up your breading station: one shallow bowl with flour seasoned with half the garlic powder, onion powder, paprika, salt, and pepper. In another bowl, whisk your eggs. And in a third, combine the Panko breadcrumbs with the Parmesan cheese and the rest of your seasonings. This is where I always make a bit of a mess, flour flying everywhere, oops!
- Breading the Chicken:
- Alright, time to get those hands a little messy! Take each chicken cutlet, dredge it really well in the seasoned flour, shaking off any excess. Then, dip it into the whisked eggs, letting any extra drip off. Finally, press it firmly into the Panko and Parmesan mixture, making sure it’s completely coated. You want a nice, thick layer for maximum crispiness. I remember one time, I rushed this step, and the breading barely stuck a real disappointment, so take your time here!
- Fry to Golden Crispy Perfection:
- Heat a generous amount of olive oil in a large skillet over medium-high heat. You want about 1/2 inch of oil. Once it’s shimmering, carefully place your breaded chicken cutlets in the hot oil. Don’t overcrowd the pan, you might need to do this in batches. Cook for 3-4 minutes per side, until they’re gloriously golden brown and cooked through. The smell at this stage? Oh my goodness, it’s divine! I sometimes get impatient and flip them too early, resulting in uneven browning, so resist the urge!
- Assemble Your Crispy Parmesan Chicken Wraps:
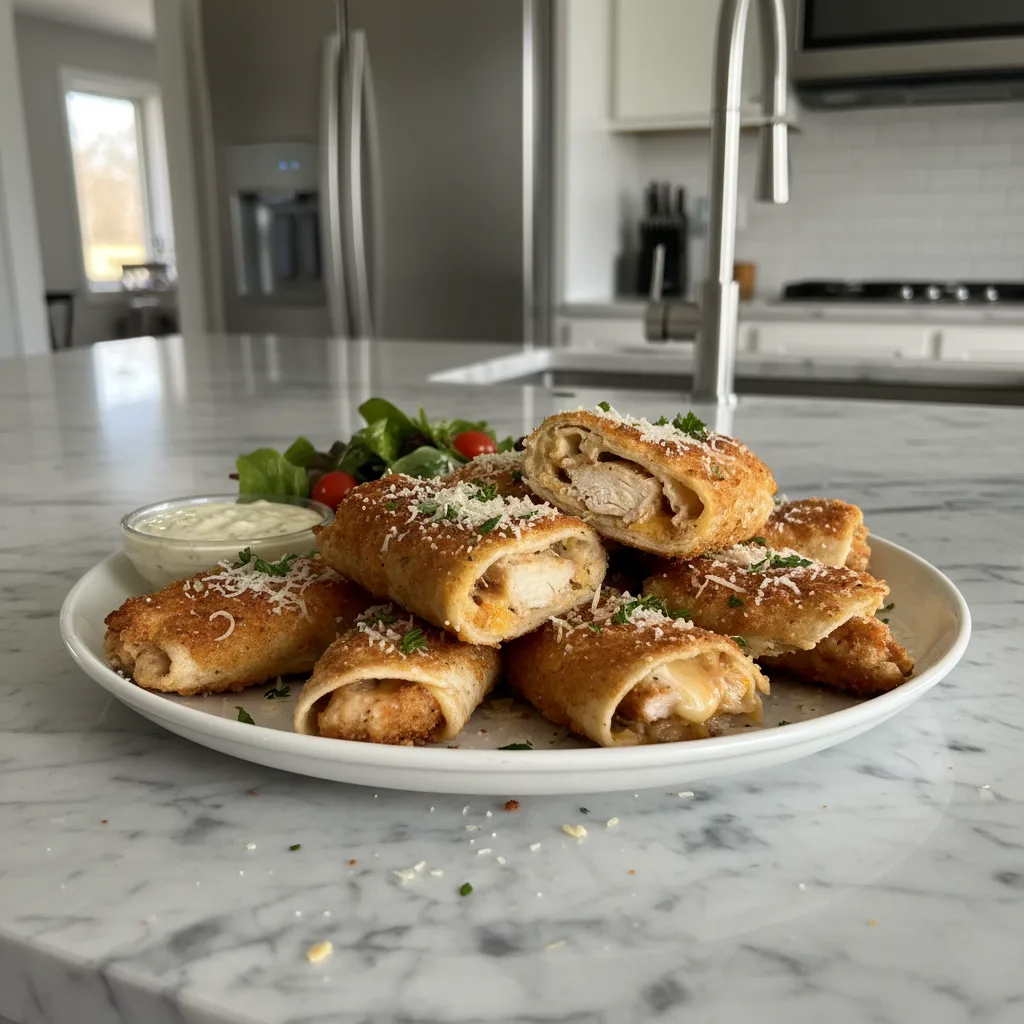
- Once the chicken is cooked, transfer it to a plate lined with paper towels to drain any excess oil. Now, grab a large tortilla. Spread a generous layer of your favorite dressing down the center. Top that with some fresh shredded lettuce, diced tomatoes, and then two or three slices of your crispy Parmesan chicken. This is where I sometimes load it up too much and have trouble rolling, but hey, it’s worth it!
- Roll ‘Em Up:
- Folding a wrap can be tricky, but you got this! Fold in the sides of the tortilla first, then tightly roll it up from the bottom, creating a neat little package. If you’re feeling fancy, you can slice them in half diagonally to reveal all that delicious filling. I always manage to get dressing on my fingers, but that’s just part of the fun, right?
- Optional: A Quick Toast for Extra Crispiness:
- To take your crispy Parmesan chicken wraps to the next level, heat a dry skillet or a griddle over medium heat. Place your assembled wraps seam-side down and toast for 1-2 minutes per side, until the tortilla is lightly golden and slightly crispy. This step is a game-changer, honestly! It makes the wrap warm and helps seal everything in beautifully. The final result should be a perfectly toasty, crunchy, and utterly satisfying wrap that just begs to be devoured.
There was one evening, completely exhausted, I decided to make these crispy Parmesan chicken wraps, but I was out of tortillas. Panic set in! I ended up serving the chicken over a big salad, and honestly, it was still fantastic, just not the wrap experience I’d planned. It taught me that sometimes, even when things go a little sideways, the core flavors of a dish can still shine through. Plus, it made for a great “oops, improvising!” dinner story.
Storing Crispy Parmesan Chicken Wraps
Okay, let’s talk leftovers. The crispy Parmesan chicken itself stores pretty well in an airtight container in the fridge for up to 3-4 days. Now, the wraps? That’s a different story. If you assemble the wraps with all the fresh fixings and dressing, they tend to get a bit soggy overnight. I microwaved one once, thinking it would be quick, and the dressing separated, the lettuce wilted it was a sad, soggy mess, so don’t do that lol. My advice? Store the chicken separately from the tortillas, lettuce, tomatoes, and dressing. When you’re ready for another wrap, just quickly reheat the chicken (a toaster oven or air fryer is best for regaining crispiness!), warm a tortilla, and assemble it fresh. It makes a huge difference, honestly, and keeps everything tasting great!

Crispy Parmesan Chicken Wraps: Ingredient Swaps
Life happens, and sometimes you just don’t have exactly what the recipe calls for, right? I’ve had my fair share of ingredient substitution experiments. For the chicken, if you only have chicken thighs, go for it! Just slice them thin and adjust cooking time slightly. I tried using pork cutlets once, and it worked… kinda. It was good, but not quite the same vibe. For the breadcrumbs, if Panko is nowhere to be found, regular breadcrumbs will work, but you won’t get that same intense crunch, so manage expectations. I’ve even used crushed cornflakes in a pinch, and that actually gave a decent crisp! As for the cheese, Pecorino Romano can stand in for Parmesan, offering a sharper, saltier kick. And if you’re out of tortillas, serve the crispy chicken over a big salad or even in a bun for a sandwich. Don’t be afraid to play around!
Serving Your Crispy Parmesan Chicken Wraps
These crispy Parmesan chicken wraps are a meal in themselves, but sometimes you want a little something extra, you know? For a light side, I often whip up a simple green salad with a zesty vinaigrette the fresh tang cuts through the richness of the chicken beautifully. Sometimes, if I’m feeling a bit fancy (or just have extra veggies), a simple roasted vegetable medley, like asparagus or broccoli, pairs wonderfully. And for drinks? A crisp, chilled lemonade or even an iced tea feels just right. If it’s a “treat yourself” kind of night, these wraps with a glass of crisp white wine and a cheesy rom-com? Yes please. Honestly, they’re so versatile, they fit almost any mood or occasion, from a quick solo dinner to a casual family meal.
The Story Behind These Crispy Parmesan Chicken Wraps
You know, some recipes just evolve in your kitchen. This idea for crispy Parmesan chicken wraps didn’t come from a fancy cookbook or a specific cultural tradition, but rather from a mishmash of cravings and kitchen experiments. It’s got that Italian-American breaded cutlet vibe, but wrapped up in a way that feels distinctly American fast-casual. I first started playing with the concept after a trip to a local deli that had this incredible chicken Caesar wrap, but I wanted something with more crunch, more “oomph.” So, I took my favorite Parmesan-crusted chicken technique, added the fresh wrap elements, and boom! It became this comforting fusion dish that just screams “home-cooked, but make it exciting.” It’s a testament to how personal cooking can be, creating something new from familiar favorites.
So there you have it, my friends! These crispy Parmesan chicken wraps are more than just a meal, they’re a testament to making delicious, comforting food even on the busiest of days. They’ve seen me through countless chaotic evenings and brought smiles to many dinner tables. I truly hope you give them a whirl and find as much joy in them as I do. Don’t forget to share your own kitchen adventures and any fun twists you add I’d honestly love to hear about them!

Frequently Asked Questions
- → Can I bake the chicken instead of frying for these Crispy Parmesan Chicken Wraps?
You absolutely can! I’ve done it when I’m trying to be a bit healthier. Just bake at 400°F (200°C) for about 15-20 minutes, flipping halfway, until golden and cooked through. It won’t be quite as crispy as fried, but it’s still delicious, honestly!
- → What if I don’t have Panko breadcrumbs for these Crispy Parmesan Chicken Wraps?
No Panko? No problem! Regular breadcrumbs will work, but the crispiness won’t be quite as intense. I’ve also had decent luck with crushed cornflakes or even finely crushed crackers in a pinch, though it was a bit of an “oops, trying something new” moment!
- → How do I prevent my Crispy Parmesan Chicken Wraps from getting soggy?
Ah, the dreaded soggy wrap! My best advice from personal experience is to let the chicken cool a bit before assembling, and store all your components separately. Assemble just before eating. I once tried to prep them hours ahead, and it was a soggy disaster, so learn from my mistake!
- → Can I make the chicken ahead of time for these Crispy Parmesan Chicken Wraps?
Yes, you totally can! Cooked chicken stores well in the fridge for 3-4 days. When you’re ready to eat, reheat it in an air fryer or toaster oven for a few minutes to bring back that lovely crispness. I do this often for quick weeknight lunches!
- → What other sauces work well in these Crispy Parmesan Chicken Wraps?
Oh, the possibilities! I’ve tried honey mustard, a spicy mayo, even a simple marinara for a more Italian feel. My partner loves a blue cheese dressing. Don’t be afraid to experiment with what you have in the fridge, honestly, most creamy sauces are a win!

Crispy Parmesan Chicken Wraps for Dinner
- Prep Time: 15 Minutes
- Cook Time: 20 Minutes
- Total Time: 35 Minutes
- Yield: 4 Servings
- Category: Easy dinners
Description
Quick, crispy Parmesan chicken wraps are your new weeknight hero! Easy to make, bursting with flavor, and oh-so-satisfying. Dinner just got delicious.
Ingredients
- Main Ingredients:
- Boneless, skinless chicken breasts (2 large)
- Large flour tortillas (4-6)
- Grated Parmesan cheese (1/2 cup)
- Panko breadcrumbs (1 cup)
- Flavor Enhancers:
- All-purpose flour (1/2 cup)
- Large eggs (2, whisked)
- Garlic powder (1 tsp)
- Onion powder (1 tsp)
- Smoked paprika (1/2 tsp)
- Salt (1/2 tsp, plus more for seasoning)
- Black pepper (1/4 tsp, plus more for seasoning)
- Fresh Fixings:
- Shredded lettuce (2 cups)
- Diced tomatoes (1 large)
- Your favorite ranch or Caesar dressing (1/2 cup)
- Make It Special:
- Olive oil (for frying, about 1/2 cup)
- Fresh parsley (for garnish, optional)
- Fresh lemon (for serving, optional)
Instructions
- Prep Your Chicken & Breading Stations:: First things first, let’s get organized! Take those chicken breasts and slice them into thin cutlets, about 1/2-inch thick. If they’re too thick, they won’t get as crispy, and who wants that? Now, set up your breading station: one shallow bowl with flour seasoned with half the garlic powder, onion powder, paprika, salt, and pepper. In another bowl, whisk your eggs. And in a third, combine the Panko breadcrumbs with the Parmesan cheese and the rest of your seasonings. This is where I always make a bit of a mess, flour flying everywhere, oops!
- Breading the Chicken:: Alright, time to get those hands a little messy! Take each chicken cutlet, dredge it really well in the seasoned flour, shaking off any excess. Then, dip it into the whisked eggs, letting any extra drip off. Finally, press it firmly into the Panko and Parmesan mixture, making sure it’s completely coated. You want a nice, thick layer for maximum crispiness. I remember one time, I rushed this step, and the breading barely stuck – a real disappointment, so take your time here!
- Fry to Golden Crispy Perfection:: Heat a generous amount of olive oil in a large skillet over medium-high heat. You want about 1/2 inch of oil. Once it’s shimmering, carefully place your breaded chicken cutlets in the hot oil. Don’t overcrowd the pan, you might need to do this in batches. Cook for 3-4 minutes per side, until they’re gloriously golden brown and cooked through. The smell at this stage? Oh my goodness, it’s divine! I sometimes get impatient and flip them too early, resulting in uneven browning, so resist the urge!
- Assemble Your Crispy Parmesan Chicken Wraps:: Once the chicken is cooked, transfer it to a plate lined with paper towels to drain any excess oil. Now, grab a large tortilla. Spread a generous layer of your favorite dressing down the center. Top that with some fresh shredded lettuce, diced tomatoes, and then two or three slices of your crispy Parmesan chicken. This is where I sometimes load it up too much and have trouble rolling, but hey, it’s worth it!
- Roll ‘Em Up:: Folding a wrap can be tricky, but you got this! Fold in the sides of the tortilla first, then tightly roll it up from the bottom, creating a neat little package. If you’re feeling fancy, you can slice them in half diagonally to reveal all that delicious filling. I always manage to get dressing on my fingers, but that’s just part of the fun, right?
- Optional: A Quick Toast for Extra Crispiness:: To take your crispy Parmesan chicken wraps to the next level, heat a dry skillet or a griddle over medium heat. Place your assembled wraps seam-side down and toast for 1-2 minutes per side, until the tortilla is lightly golden and slightly crispy. This step is a game-changer, honestly! It makes the wrap warm and helps seal everything in beautifully. The final result should be a perfectly toasty, crunchy, and utterly satisfying wrap that just begs to be devoured.


