You know those nights, right? The ones where you stare into the fridge, utterly stumped, and the thought of another complicated recipe just makes you want to order takeout? Yeah, I’ve been there, like, a million times. This Baked Caesar Chicken recipe? It came to me during one of those “what even IS dinner?” moments. I had some chicken breasts, a bottle of Caesar dressing (always in my fridge, honestly), and a desperate plea for something that wasn’t boring. The smell of it baking, all garlicky and savory, completely transformed my kitchen from “chaos zone” to “comfort central.” It’s become my little secret weapon for getting a genuinely delicious, juicy Baked Caesar Chicken on the table without a fuss.
I remember the first time I tried making this. I was so convinced I’d overcook the chicken, because, you know, my track record with chicken breasts is… spotty. I pulled it out of the oven, holding my breath, and oops! I’d forgotten to add a little extra parmesan on top. But even without that, it was so tender and flavorful. My son, who usually eyes new dishes suspiciously, actually asked for seconds! That’s when I knew this easy Baked Caesar Chicken was a keeper.

Ingredients
- Boneless, Skinless Chicken Breasts (4): These are your canvas! I usually go for about 6-8 oz each. Don’t use those super thin cutlets unless you want dried-out shoe leather, you need a little thickness for that juicy Baked Caesar Chicken texture.
- Caesar Dressing (1/2 cup): This is the star, hon! Use your favorite creamy, garlicky brand. I’ve tried homemade, and it’s great, but for ease, a good store-bought one works wonders. I tried a low-fat version once, and honestly, it just didn’t have the same oomph. Stick to the good stuff.
Parmesan Cheese (1/2 cup, freshly grated): Grate it yourself, please! The pre-shredded stuff has additives that make it melt weird. This adds that salty, nutty kick. More is always better, in my humble opinion. I sometimes sprinkle extra on top halfway through baking.
Garlic Powder (1 tsp): Because you can never have enough garlic, right? This gives a consistent background garlic flavor without having to mince anything. I once used fresh minced garlic and it burned a little oops! Stick to the powder for this one.
Black Pepper (1/2 tsp): A little fresh crack of pepper wakes everything up. I always add a bit more than the recipe says, just because I love that slight bite. It really makes the flavor pop against the creamy dressing.
- Fresh Parsley (2 tbsp, chopped): This is for a little freshness and color at the end. It brightens everything up! I swear, just seeing green makes a dish feel more gourmet, even when you know it’s super simple.
Instructions
- Prep Your Chicken:
- Okay, first things first, let’s get those chicken breasts ready. Pat them really dry with paper towels, this helps the seasoning stick and encourages a nicer finish. If they’re super thick, like over an inch, you might want to gently pound them to an even thickness. I’ve definitely skipped this step before and ended up with some parts cooked through and others still a bit… raw. Not fun, trust me! This ensures your Baked Caesar Chicken cooks evenly and stays juicy.
- Marinate the Magic:
- Now, grab a medium bowl and toss your chicken breasts in there. Pour in that glorious Caesar dressing, sprinkle with the garlic powder, and give it a good grind of black pepper. Mix it all up until every piece of chicken is coated. I like to use my hands for this, it just feels right! Let it sit for at least 30 minutes on the counter, or if you’ve got time, pop it in the fridge for a couple of hours. I once tried to rush it and the flavor wasn’t as deep don’t make my mistake!
- Preheat and Prep Pan:
- While your chicken is getting cozy in its marinade, go ahead and preheat your oven to 400°F (200°C). This is where I always forget to line the baking dish, and then I’m stuck scrubbing later oops! Line a baking dish with parchment paper or foil for easy cleanup. Trust me, future you will thank present you for this little step. The smell of the oven warming up always gets me excited for dinner!
- Arrange and Sprinkle:
- Take your marinated chicken out of the bowl and arrange the pieces in a single layer in your prepared baking dish. Try not to overcrowd them, they need space to bake evenly. Now, sprinkle that lovely grated Parmesan cheese generously over each chicken breast. This is where the magic happens, creating that cheesy, savory crust on your Baked Caesar Chicken. I once dumped it all in the middle, and it didn’t spread evenly, so try to get a nice, even coating.
- Bake to Golden Perfection:
- Pop that dish into your preheated oven. Bake for about 20-25 minutes, depending on the thickness of your chicken. You’re looking for an internal temperature of 165°F (74°C). If you don’t have a meat thermometer, please get one! It’s a game-changer for avoiding dry chicken. I used to guess and, well, let’s just say some chickens met a crispy, dry fate. This ensures your Baked Caesar Chicken is perfectly juicy.
- Rest and Garnish:
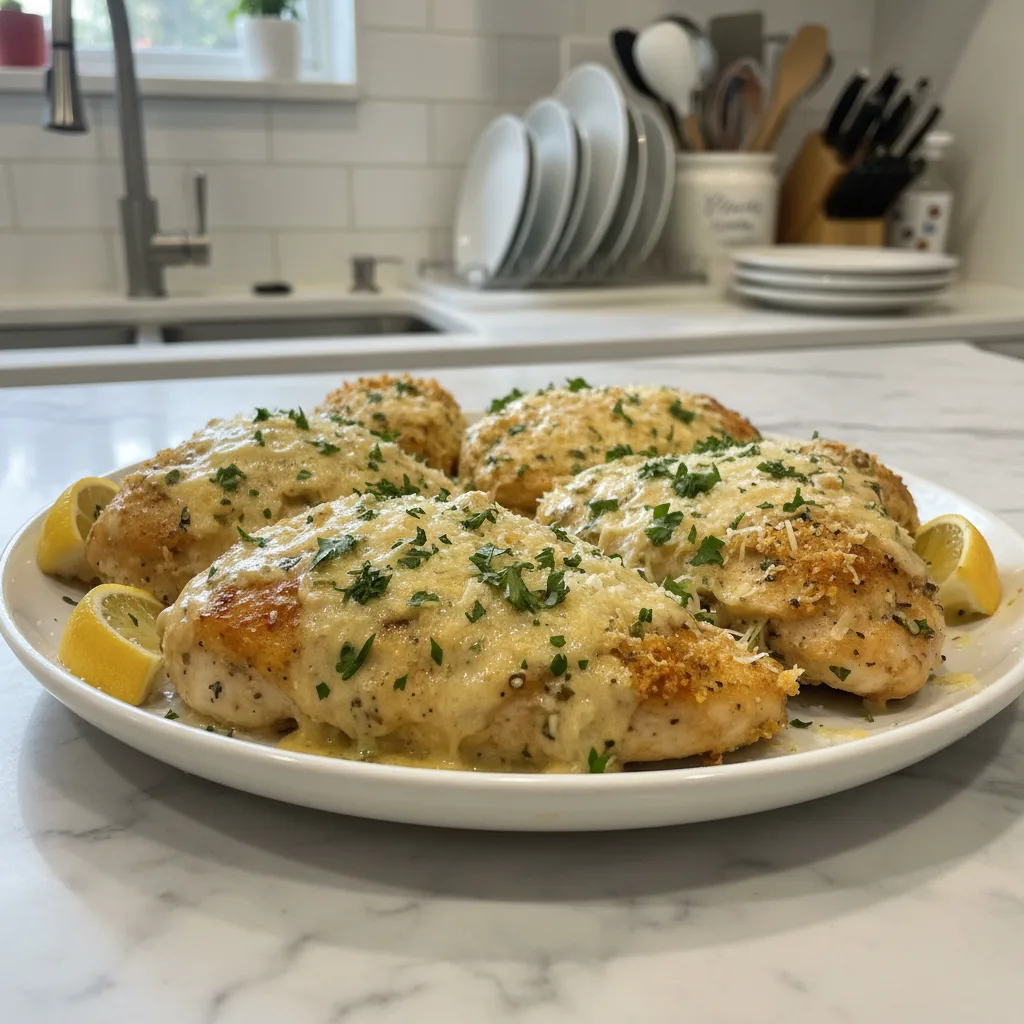
- Once your chicken hits that perfect temperature, pull it out of the oven. This next part is crucial: let it rest for 5-10 minutes before slicing. This allows the juices to redistribute, keeping your chicken incredibly tender and juicy. While it rests, sprinkle with fresh chopped parsley for a burst of color and herbaceousness. The aroma at this stage is just heavenly, all garlicky and cheesy! Slice it up and get ready for a truly simple, satisfying meal.
Honestly, the best part of making this dish is how quickly it transforms my kitchen from a chaotic mess into a haven of garlicky, cheesy goodness. One time, I was so busy chatting on the phone I almost forgot the Parmesan, but a last-minute dash saved the day. That’s real life, right? This easy Baked Caesar Chicken always delivers on flavor, even when my brain isn’t quite on its A-game.
Baked Caesar Chicken Storage Tips
So, you’ve got leftovers of this delicious Baked Caesar Chicken? Lucky you! Once cooled, store any extra chicken in an airtight container in the refrigerator for up to 3-4 days. I’ve found that it reheats best in the oven at a lower temperature (around 300°F/150°C) for about 10-15 minutes, covered with foil, to keep it from drying out. I once microwaved it on high, and the sauce separated and the chicken became a bit rubbery so don’t do that lol. It’s still tasty cold, sliced over a salad for lunch the next day, which is my favorite way to enjoy it. Just remember, the fresher, the better for that juicy texture.

Baked Caesar Chicken Ingredient Substitutions
Life happens, and sometimes you don’t have exactly what the recipe calls for. I get it! For the chicken, boneless, skinless chicken thighs work beautifully here too, they tend to stay even juicier. Just adjust the baking time, likely a few minutes longer. No Caesar dressing? A creamy Italian dressing could work in a pinch, but the flavor profile will shift quite a bit. I tried a ranch dressing once, and it worked… kinda, but it wasn’t the same comforting taste. If you’re out of Parmesan, a sprinkle of a good quality Pecorino Romano could offer a similar salty kick, though it’s a bit sharper. For the garlic powder, you can use fresh minced garlic, about 2-3 cloves, but be mindful it doesn’t burn, especially if it’s directly exposed to high heat.
Baked Caesar Chicken Serving Suggestions
This Baked Caesar Chicken is so versatile! For a simple weeknight meal, I love serving it alongside some roasted asparagus or a big green salad with a light vinaigrette. If I’m feeling a bit more indulgent, a creamy pasta side or some garlic mashed potatoes are just divine. Honestly, this dish and a rom-com? Yes please. It also pairs wonderfully with a crisp white wine, like a Sauvignon Blanc, or even a light beer. My favorite combo for a cozy night is this chicken with a side of fluffy couscous and a glass of lemonade simple, comforting, and just hits different after a long day.
Cultural Backstory
While Caesar salad itself has a fascinating, somewhat debated origin story (shoutout to Tijuana, Mexico!), transforming it into a baked chicken dish is a modern, home-cook innovation. It’s a testament to how beloved and adaptable the classic Caesar flavors are. For me, this particular Baked Caesar Chicken recipe feels like a nod to those comforting, familiar flavors of a classic Caesar salad, but in a hearty, main-dish format. It’s not steeped in centuries of tradition, but it embodies that practical, delicious spirit of American home cooking taking something everyone loves and making it even easier and more satisfying for a busy weeknight. It’s the kind of recipe that feels like it’s always been in your family, even if you just discovered it last week!
There you have it, friends! My go-to, stress-free recipe for Baked Caesar Chicken. It’s simple, it’s juicy, and it just makes dinner feel like a win. I hope it brings as much comfort and ease to your table as it does to mine. Honestly, seeing that golden-brown chicken come out of the oven, smelling all garlicky and cheesy, always puts a smile on my face. Give it a try, and let me know how your version turns out!

Frequently Asked Questions
- → Can I use bone-in chicken for Baked Caesar Chicken?
You totally can, but the baking time will be longer, probably closer to 30-40 minutes, depending on the size. Just make sure to check the internal temperature, because bone-in takes a bit more patience!
- → What if I don’t have Caesar dressing?
If you’re in a pinch, a good creamy Italian dressing can work, but the flavor will be different. I tried a lemon-herb vinaigrette once, and it was okay, but it didn’t give that classic garlicky Caesar vibe.
- → How do I make sure my Baked Caesar Chicken doesn’t dry out?
Two big things: don’t overcook it (use that meat thermometer!) and always let it rest after baking. I learned the hard way that cutting into it too soon lets all those precious juices escape.
- → Can I prep this ahead of time?
Absolutely! You can marinate the chicken in the dressing for up to 24 hours in the fridge. Then, just pop it in the oven when you’re ready. It makes weeknight dinners a breeze, honestly!
- → What are some fun variations for this recipe?
Oh, the possibilities! Try adding some sun-dried tomatoes or capers to the marinade. Or, for a little crunch, sprinkle some panko breadcrumbs mixed with Parmesan on top before baking. I’ve even added a layer of spinach under the chicken once!

Baked Caesar Chicken: Juicy, Easy Weeknight Dinner
- Prep Time: 10 Minutes
- Cook Time: 25 Minutes
- Total Time: 35 Minutes
- Yield: 4 Servings 1x
- Category: Dinner Recipes
Description
Baked Caesar Chicken that’s juicy and so easy, it’ll become your new favorite weeknight dinner. Simple ingredients, big flavor, and minimal fuss.
Ingredients
- Main Ingredients:
- 4 boneless, skinless chicken breasts (about 6–8 oz each)
- 1/2 cup creamy Caesar dressing
- Flavor Boosters:
- 1/2 cup freshly grated Parmesan cheese
- 1 tsp garlic powder
- 1/2 tsp black pepper
- Fresh Touches:
- 2 tbsp fresh parsley, chopped (for garnish)
Instructions
- Prep Your Chicken:: Okay, first things first, let’s get those chicken breasts ready. Pat them really dry with paper towels; this helps the seasoning stick and encourages a nicer finish. If they’re super thick, like over an inch, you might want to gently pound them to an even thickness. I’ve definitely skipped this step before and ended up with some parts cooked through and others still a bit… raw. Not fun, trust me! This ensures your Baked Caesar Chicken cooks evenly and stays juicy.
- Marinate the Magic:: Now, grab a medium bowl and toss your chicken breasts in there. Pour in that glorious Caesar dressing, sprinkle with the garlic powder, and give it a good grind of black pepper. Mix it all up until every piece of chicken is coated. I like to use my hands for this, it just feels right! Let it sit for at least 30 minutes on the counter, or if you’ve got time, pop it in the fridge for a couple of hours. I once tried to rush it and the flavor wasn’t as deep – don’t make my mistake!
- Preheat and Prep Pan:: While your chicken is getting cozy in its marinade, go ahead and preheat your oven to 400°F (200°C). This is where I always forget to line the baking dish, and then I’m stuck scrubbing later – oops! Line a baking dish with parchment paper or foil for easy cleanup. Trust me, future you will thank present you for this little step. The smell of the oven warming up always gets me excited for dinner!
- Arrange and Sprinkle:: Take your marinated chicken out of the bowl and arrange the pieces in a single layer in your prepared baking dish. Try not to overcrowd them; they need space to bake evenly. Now, sprinkle that lovely grated Parmesan cheese generously over each chicken breast. This is where the magic happens, creating that cheesy, savory crust on your Baked Caesar Chicken. I once dumped it all in the middle, and it didn’t spread evenly, so try to get a nice, even coating.
- Bake to Golden Perfection:: Pop that dish into your preheated oven. Bake for about 20-25 minutes, depending on the thickness of your chicken. You’re looking for an internal temperature of 165°F (74°C). If you don’t have a meat thermometer, please get one! It’s a game-changer for avoiding dry chicken. I used to guess and, well, let’s just say some chickens met a crispy, dry fate. This ensures your Baked Caesar Chicken is perfectly juicy.
- Rest and Garnish:: Once your chicken hits that perfect temperature, pull it out of the oven. This next part is crucial: let it rest for 5-10 minutes before slicing. This allows the juices to redistribute, keeping your chicken incredibly tender and juicy. While it rests, sprinkle with fresh chopped parsley for a burst of color and herbaceousness. The aroma at this stage is just heavenly, all garlicky and cheesy! Slice it up and get ready for a truly simple, satisfying meal.


