Okay, so I used to think roasting a whole turkey was a full-day event, something reserved for holidays and major family gatherings. Honestly, the thought of it made my shoulders tense up. But then, a few years back, I stumbled upon spatchcocking and my world, friends, it changed. I remember the first time I tried it, skeptical, thinking there was no way a whole bird could be ready in under two hours. The kitchen was a bit of a mess, flour dust everywhere, but that aroma? Oh, that golden, savory smell filling the house was something else. This method isn’t just fast, it’s a revelation for getting that incredible crispy skin and unbelievably juicy meat, every single time. It’s become my little secret for feeling like a kitchen wizard without actually being one.
My first attempt at spatchcocking was… memorable. I almost broke a bone trying to snip through the backbone with kitchen shears that were clearly not up to the task. Seriously, I was wrestling that bird like it owed me money! I finally had to call my neighbor, bless his heart, to borrow his heavy-duty poultry shears. There were feathers, a little bit of blood, and a lot of giggling involved, but hey, we got there. It’s a messy job, but so worth it for the results, trust me.

Crispy Roast Spatchcock Turkey: Ingredients
- Whole Turkey (10-12 lbs): This is our star! Choose a fresh, good quality bird. I usually go for one around this size because it roasts evenly and fits nicely on a standard baking sheet. Don’t go too big unless you have a commercial oven!
- Olive Oil: Essential for that gorgeous golden, crispy skin. I slather it on generously, it’s what helps everything stick and conduct heat like a dream. Any good quality extra virgin olive oil works here.
- Fresh Rosemary: Oh, the smell! This herb just screams “roast” to me. I roughly chop it, because I love seeing those little green flecks. Fresh makes a huge difference over dried, honestly, it just does.
- Fresh Thyme: Another aromatic hero. Thyme and turkey are like best friends, they just belong together. Don’t be shy with it!
- Garlic Powder: A secret weapon for consistent garlic flavor everywhere. I tried fresh minced garlic once, but it tended to burn on the skin, so powder is my go-to for this method.
- Paprika (smoked or sweet): Adds a beautiful color and a subtle smoky depth. I usually reach for smoked paprika because it gives that extra layer of yum.
- Salt & Black Pepper: Non-negotiables for flavor. Season generously, both sides. I always forget to season the underside, so don’t be like me!
- Chicken or Vegetable Broth (1 cup): This goes into the pan to keep things moist and catch all those lovely drippings. It prevents the pan from burning and creates a delicious base for gravy later.
Crispy Spatchcock Turkey: Step-by-Step
- Prep Your Bird:
- First things first, get that turkey out of its packaging and pat it super, super dry with paper towels. Seriously, dryness is key for crispy skin, don’t skip this! Then, place it breast-side down on a large cutting board. Using sturdy kitchen shears, carefully cut along both sides of the backbone from tail to neck. This is where I almost lost a finger the first time, so go slow and use good shears! Remove the backbone (you can save it for stock!).
- Flatten and Season:
- Now, flip the turkey over so it’s breast-side up. Press down firmly on the breastbone until you hear a satisfying crack and the bird lays flat. This is the “spatchcocked” part! It might feel a little awkward, but trust me, it’s easier than it sounds. Transfer the flattened turkey to a large baking sheet lined with foil or parchment paper. Drizzle generously with olive oil, then sprinkle with salt, pepper, garlic powder, paprika, chopped rosemary, and thyme. Rub it all over, getting into every nook and cranny. I love the smell of the herbs warming up already!
- Oven Time!
- Preheat your oven to a scorching 450°F (230°C). While it’s heating up, pour the chicken or vegetable broth into the bottom of your baking sheet. This helps create a steamy environment initially and keeps your drippings from burning later. Once the oven is ready, carefully slide that gorgeous bird in. The high heat is what gets that skin super crispy in no time. I always peek in during the first 15 minutes, just to make sure things are sizzling nicely!
- Roast and Rotate:
- Roast the turkey for 30 minutes at 450°F (230°C). After that initial blast, reduce the oven temperature to 375°F (190°C). Continue roasting for another 45-60 minutes, or until an instant-read thermometer inserted into the thickest part of the thigh (without touching bone!) reads 165°F (74°C). I usually rotate the pan halfway through this second stage to ensure even browning. You’ll see the skin turning that beautiful golden-brown, and the aroma, oh my!
- Rest, Don’t Rush:
- Once your turkey reaches the magic 165°F, pull it out of the oven. This is the hardest part for me resisting! Loosely tent it with foil and let it rest on the baking sheet for at least 15-20 minutes before carving. This resting period is crucial! It allows the juices to redistribute throughout the meat, making it incredibly tender and moist. If you skip this, all those lovely juices will just run out onto your cutting board, and nobody wants that.
- Carve and Serve:
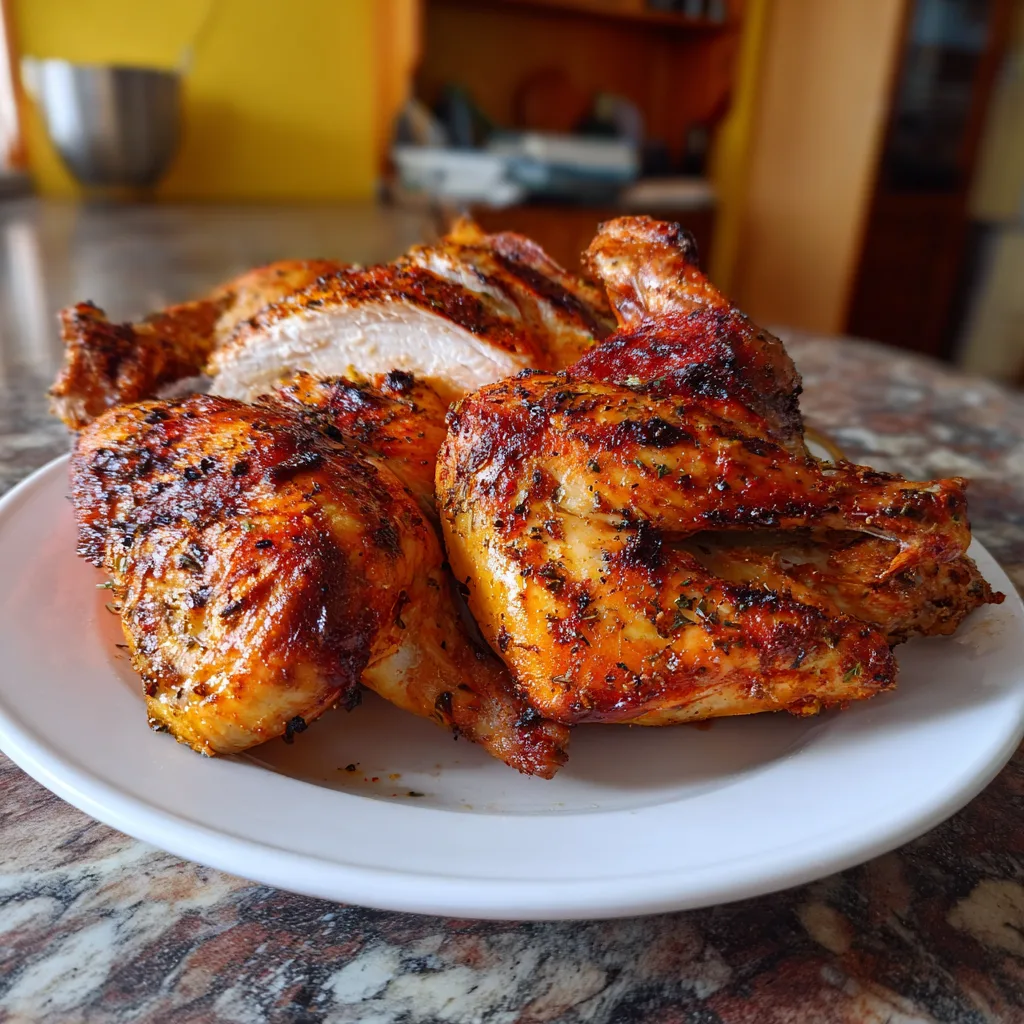
- After its well-deserved rest, it’s carving time! Since it’s spatchcocked, carving is actually much simpler than a traditional bird. You can easily remove the legs and wings, then slice the breast meat. Arrange it beautifully on a platter, maybe with some extra fresh herbs for garnish. The smell of the finished turkey, that crispy skin, and the tender meat just make me so happy. Enjoy your crispy roast spatchcock turkey!
I remember one time I got a little too excited and tried to carve the turkey right out of the oven. Juices went everywhere, and the meat ended up drier than I liked. It was a sad, sad day for that bird. Lesson learned: patience is a virtue, especially when it comes to resting meat. Now, I set a timer and make myself walk away, maybe clean up a tiny bit, or just stare at its golden glory from a distance.
Mastering Crispy Spatchcock Turkey Storage
Okay, so leftovers! This crispy roast spatchcock turkey actually holds up pretty well, which is a major bonus. Once it’s completely cooled (and I mean completely, don’t trap steam!), transfer any leftover meat into airtight containers. I usually pull the meat off the bone and store it in chunks or slices. It’ll last beautifully in the fridge for about 3-4 days. I tried freezing it once, wrapped tightly, and while it was okay, the texture wasn’t quite the same as fresh. Reheating is best done gently, maybe a quick zap in the microwave with a splash of broth to keep it moist, or in a covered pan in the oven. I microwaved it once without broth, and it was a bit tough so don’t do that lol. The crispy skin won’t stay crispy, but the flavor is still there!

Crispy Roast Spatchcock Turkey: Ingredient Substitutions
I’ve experimented quite a bit over the years, sometimes out of necessity, sometimes just for fun. For the herbs, if you don’t have fresh rosemary and thyme, you can definitely use dried, but reduce the amount by about a third, as dried herbs are more potent. I tried dried once, and it worked… kinda, but fresh is just so much better for that vibrant flavor. No olive oil? Avocado oil or even melted butter works wonders for crisping the skin. For the paprika, if you’re out of smoked, regular sweet paprika is fine, or even a pinch of cayenne if you like a little heat. I once used a “poultry seasoning” blend from my grandma’s pantry, and while it wasn’t the exact same, it gave it a lovely old-school flavor! Don’t be afraid to play around with your favorite spice blends.
Serving Suggestions for Spatchcock Turkey
This crispy roast spatchcock turkey is so versatile! For a holiday vibe, I love serving it with my creamy mashed potatoes (extra butter, obviously), a vibrant green bean casserole, and some homemade cranberry sauce. Honestly, the pan drippings from this recipe make the most incredible gravy, so don’t let those go to waste! For a weeknight, I might just whip up a simple side salad with a tangy vinaigrette and some crusty bread to soak up all the juices. This dish and a good glass of red wine, paired with a cozy movie night? Yes please! It also makes fantastic turkey sandwiches the next day, layered with some sharp cheddar and a little mayo. Pure comfort, any way you slice it.
Cultural Backstory of Spatchcocking
While spatchcocking might sound like a fancy, modern technique, it’s actually been around for ages! The term itself is thought to come from 18th-century Ireland, referring to a “dispatch cock” a bird prepared quickly, often split and grilled, for unexpected guests. It’s essentially a method of butterflying poultry to cook it faster and more evenly. For me, discovering this technique was like finding a hidden cheat code for cooking. It transformed turkey from a once-a-year ordeal into something I could genuinely consider for a special Sunday dinner. It’s a testament to how traditional cooking methods can still surprise and delight us with their practicality and delicious results, making old dishes feel new again.
So, there you have it, friends. My not-so-secret secret to a crispy, juicy turkey without all the fuss. It’s become a staple in my kitchen, a dish that brings that comforting holiday feeling without the all-day commitment. I hope you give this crispy roast spatchcock turkey a try and fall in love with it just like I did. Don’t forget to tell me how your kitchen adventures go!

Frequently Asked Questions
- → Can I spatchcock a larger turkey?
You absolutely can! I’ve done up to a 15-pounder, but just make sure it fits comfortably on your baking sheet and in your oven. A bigger bird might need an extra 10-20 minutes of cooking time, so always rely on that thermometer, hon!
- → What if I don’t have poultry shears?
Oh, I’ve been there! A very sharp, heavy-duty knife can work, but it’s much harder and riskier. If you can get your hands on some shears, it’s worth it. Otherwise, ask a butcher to spatchcock it for you they’re usually happy to help!
- → Why is my turkey skin not getting crispy?
Usually, it’s because the skin wasn’t dry enough before roasting, or there wasn’t enough oil. Also, make sure your oven is truly preheated to that high temperature. I sometimes forget to let it fully preheat, and it makes a difference!
- → How can I use the leftover backbone?
Don’t toss it! I always save the backbone and giblets (minus the liver) to make a really flavorful turkey stock. Just simmer it with some aromatics like onion, carrot, and celery for a few hours. It’s amazing for gravies or soups!
- → Can I add other seasonings to my crispy roast spatchcock turkey?
Totally! I often throw in a pinch of sage or even some onion powder if I’m feeling it. Lemon zest rubbed into the skin is also divine. Experiment with what you love, that’s the fun of cooking, right?

Crispy Spatchcock Turkey in 90 Minutes
- Prep Time: 15 Minutes
- Cook Time: 90 Minutes
- Total Time: 1 Hour 45 Minutes
- Yield: 6-8 Servings 1x
- Category: Trending Recipes
Description
Crispy Roast Spatchcock Turkey in 90 minutes! Get golden skin and juicy meat fast. Your simple recipe for an amazing, quick turkey dinner.
Ingredients
- Main Players:
- 1 whole turkey (10–12 lbs), giblets removed
- Flavor Power-Ups:
- 1/4 cup olive oil
- 2 tbsp fresh rosemary, chopped
- 1 tbsp fresh thyme, chopped
- 1 tsp garlic powder
- 1 tsp paprika (smoked or sweet)
- Kitchen Staples:
- 1.5 tsp salt
- 1 tsp black pepper
- 1 cup chicken or vegetable broth
- Optional Extras:
- Lemon slices for cavity (optional)
- Assorted root vegetables for pan (optional)
Instructions
- Prep Your Bird:: First things first, get that turkey out of its packaging and pat it super, super dry with paper towels. Seriously, dryness is key for crispy skin, don’t skip this! Then, place it breast-side down on a large cutting board. Using sturdy kitchen shears, carefully cut along both sides of the backbone from tail to neck. This is where I almost lost a finger the first time, so go slow and use good shears! Remove the backbone (you can save it for stock!).
- Flatten and Season:: Now, flip the turkey over so it’s breast-side up. Press down firmly on the breastbone until you hear a satisfying crack and the bird lays flat. This is the “spatchcocked” part! It might feel a little awkward, but trust me, it’s easier than it sounds. Transfer the flattened turkey to a large baking sheet lined with foil or parchment paper. Drizzle generously with olive oil, then sprinkle with salt, pepper, garlic powder, paprika, chopped rosemary, and thyme. Rub it all over, getting into every nook and cranny. I love the smell of the herbs warming up already!
- Oven Time!: Preheat your oven to a scorching 450°F (230°C). While it’s heating up, pour the chicken or vegetable broth into the bottom of your baking sheet. This helps create a steamy environment initially and keeps your drippings from burning later. Once the oven is ready, carefully slide that gorgeous bird in. The high heat is what gets that skin super crispy in no time. I always peek in during the first 15 minutes, just to make sure things are sizzling nicely!
- Roast and Rotate:: Roast the turkey for 30 minutes at 450°F (230°C). After that initial blast, reduce the oven temperature to 375°F (190°C). Continue roasting for another 45-60 minutes, or until an instant-read thermometer inserted into the thickest part of the thigh (without touching bone!) reads 165°F (74°C). I usually rotate the pan halfway through this second stage to ensure even browning. You’ll see the skin turning that beautiful golden-brown, and the aroma, oh my!
- Rest, Don’t Rush:: Once your turkey reaches the magic 165°F, pull it out of the oven. This is the hardest part for me – resisting! Loosely tent it with foil and let it rest on the baking sheet for at least 15-20 minutes before carving. This resting period is crucial! It allows the juices to redistribute throughout the meat, making it incredibly tender and moist. If you skip this, all those lovely juices will just run out onto your cutting board, and nobody wants that.
- Carve and Serve:: After its well-deserved rest, it’s carving time! Since it’s spatchcocked, carving is actually much simpler than a traditional bird. You can easily remove the legs and wings, then slice the breast meat. Arrange it beautifully on a platter, maybe with some extra fresh herbs for garnish. The smell of the finished turkey, that crispy skin, and the tender meat just make me so happy. Enjoy your crispy roast spatchcock turkey!


