Remember that one Halloween when I tried to carve a pumpkin, and it ended up looking more like a sad, lopsided squash with a toothache? Honestly, my kitchen skills weren’t always… elegant. But then I stumbled into baking these Halloween Ghost Cupcakes, and something just clicked. There’s something so wonderfully simple about turning a plain cupcake into a whimsical, spooky little ghost. The smell of vanilla baking always takes me back, and these little guys? They bring that same warm, fuzzy feeling, but with a fun, festive twist. They’re definitely a highlight of our spooky season celebrations, even if my first attempts looked a little more like melted snowmen than ghosts, ha!
One time, I was so proud of my perfectly piped ghost frosting, only to realize I’d forgotten the chocolate chips for the eyes until after they were all set. I ended up trying to melt some chocolate and dab it on with a toothpick, which, to be real, looked less like eyes and more like my ghosts had been in a minor fender bender. It was a mess, but we all had a good laugh, and they still tasted incredible. That’s the beauty of baking, right? Imperfections just add character.

Halloween Ghost Cupcakes: The Ingredients
- All-Purpose Flour: This is our base, the foundation for fluffy cupcakes. Don’t go trying to swap it for almond flour unless you’re ready for a whole different texture I tried that once, and it was… dense.
- Granulated Sugar: For that essential sweetness! I usually stick to the amount, but if you have a serious sweet tooth, a tiny bit more won’t hurt. Don’t use less, though, or your ghosts might taste a little grumpy.
- Baking Powder & Baking Soda: These are the magic leaveners. Make sure yours aren’t expired, hon! I once used old baking powder, and my cupcakes didn’t rise, they just sat there, looking sad and flat.
- Salt: Just a pinch, but it’s crucial! It balances the sweetness and really makes all the other flavors pop. Seriously, don’t skip it, it’s like the secret whisper in the recipe.
- Unsalted Butter: Room temperature, please! This is where the richness comes from. I swear by unsalted so I can control the salt content. Trying to use cold butter? Oh, that’s a kitchen disaster waiting to happen for sure.
- Large Eggs: Also at room temperature! They bind everything together and add richness. I once cracked an egg and found two yolks totally made my day, felt like a little kitchen lottery win!
- Vanilla Extract: Use the good stuff! It’s such a simple ingredient, but it makes a huge difference in flavor. I always add a tiny splash more than the recipe calls for because, well, vanilla.
- Buttermilk: This is key for tender, moist cupcakes. If you don’t have it, a quick hack is a tablespoon of lemon juice or white vinegar in regular milk, let it sit for 5 minutes. Works like a charm, I’ve done it countless times.
- Powdered Sugar (Confectioners’ Sugar): Essential for that smooth, dreamy ghost frosting. Sift it, or you’ll end up with lumps, and nobody wants lumpy ghosts, trust me.
- Heavy Cream: For a rich, stable frosting. Don’t use anything less, skim milk will make your frosting runny, and your ghosts will look like they’re melting!
- Mini Chocolate Chips: These are for the adorable ghost eyes! I’ve also used edible googly eyes, which are super fun and give them even more personality.
Crafting Your Halloween Ghost Cupcakes
- Mix the Dry Ingredients:
- First things first, grab a medium bowl and whisk together your flour, sugar, baking powder, baking soda, and salt. Give it a good whisk until everything is combined. I always imagine I’m mixing up a little bit of magic potion here, honestly. This step is pretty straightforward, but making sure it’s all evenly distributed helps avoid those weird pockets of unmixed ingredients later on. You want a consistent, fluffy base for your Halloween Ghost Cupcakes.
- Cream the Wet Ingredients:
- In a separate, larger bowl, or your stand mixer, cream together the softened unsalted butter and granulated sugar until it’s light and fluffy. This usually takes a good 2-3 minutes. Then, beat in the eggs one at a time, making sure each is fully incorporated before adding the next. Don’t rush this part! I once got impatient and added all the eggs at once, and the mixture looked a bit curdled. Oops! It still baked up okay, but it wasn’t as smooth.
- Combine and Alternate:
- Now for the main event! Gradually add your dry ingredients to the wet ingredients, alternating with the buttermilk. Start and end with the dry ingredients. Mix until just combined overmixing is the enemy of tender cupcakes, I’ve learned that the hard way. The batter should look smooth and creamy, smelling faintly of vanilla and sweet goodness. This is where the magic really starts to happen for these Halloween Ghost Cupcakes!
- Bake Those Beauties:
- Line your muffin tin with cupcake liners and fill each about two-thirds full with batter. Pop them into your preheated oven at 350°F (175°C) for 18-22 minutes. Keep an eye on them! A toothpick inserted into the center should come out clean. My kitchen always smells incredible at this point, like a warm, sugary cloud. Let them cool in the tin for a few minutes before transferring to a wire rack to cool completely. Patience is a virtue here, trust me.
- Whip Up the Ghostly Frosting:
- While your cupcakes are cooling, let’s make that dreamy frosting. In a large bowl, beat the softened butter until creamy. Gradually add the sifted powdered sugar, a little at a time, mixing until smooth. Then, pour in the heavy cream and vanilla extract. Beat on high until the frosting is light, fluffy, and holds stiff peaks. This is the fun part where your frosting transforms into something wonderfully pipeable. If it feels too thick, a tiny splash more cream can fix it, too thin, more powdered sugar! My first attempt was so runny, my ghosts looked like they were having a bad day.
- Decorate Your Halloween Ghost Cupcakes:
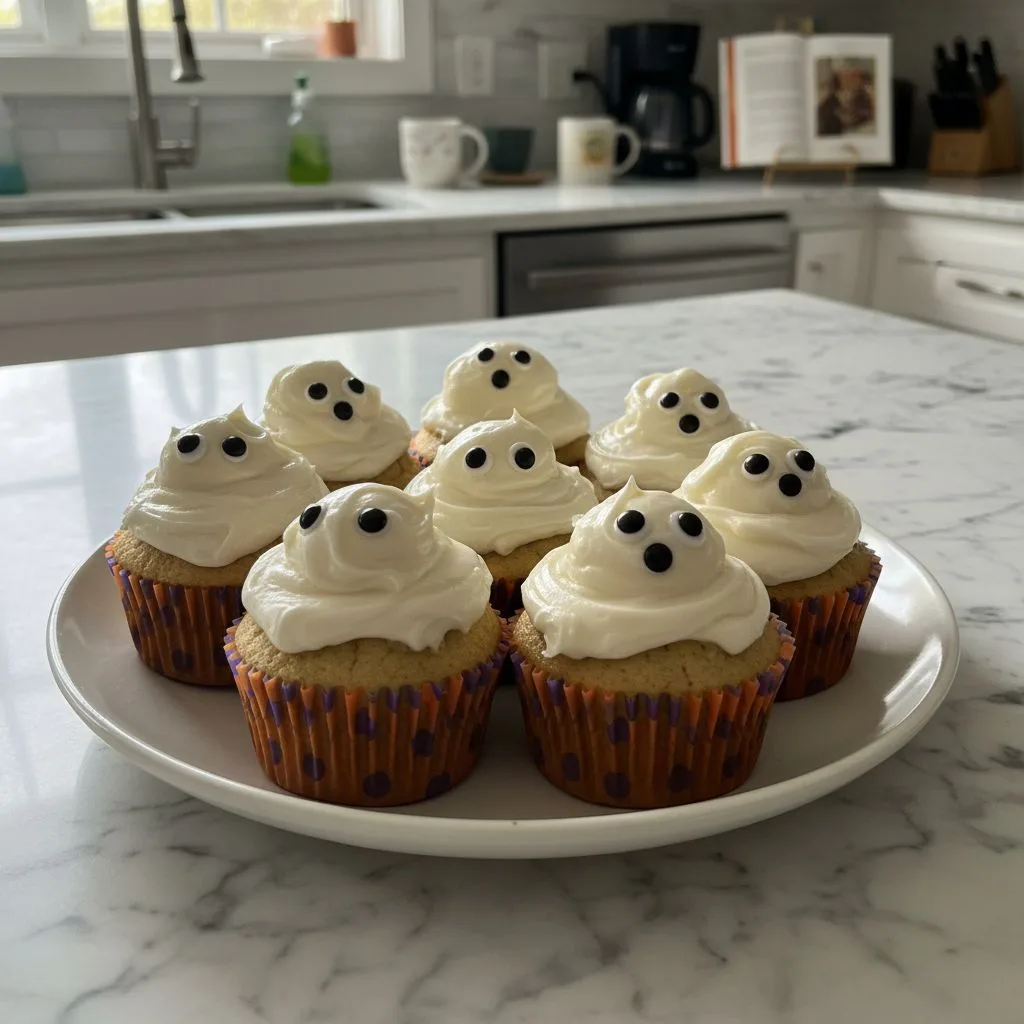
- Once the cupcakes are completely cool, transfer your frosting to a piping bag fitted with a large round tip (or just snip the corner off a Ziploc bag, I do it all the time!). Pipe a tall swirl of frosting onto each cupcake, pulling up at the top to create a ghost shape. Then, carefully place two mini chocolate chips for eyes. Honestly, watching them come to life is just the sweetest thing. They’ll look spooky and adorable, ready for their Halloween debut!
There was this one time, mid-frosting frenzy, my cat, Luna, decided to bat at the piping bag. Frosting went flying, and I ended up with a dollop on my nose! It was pure kitchen chaos, but honestly, it’s those little, unexpected moments that make baking so much fun. These Halloween Ghost Cupcakes are more than just a recipe, they’re an excuse for a little bit of playful mess and a lot of sweet memories.
Storing Your Halloween Ghost Cupcakes
So, you’ve got leftover Halloween Ghost Cupcakes? Lucky you! For best results, store them in an airtight container at room temperature for up to 2-3 days. If it’s a super warm day, or if your kitchen is just generally steamy, you might want to pop them in the fridge to keep that frosting firm. I once left a batch out too long on a particularly humid afternoon, and the ghosts started to look a little… sweaty. Not ideal! If you do refrigerate them, just let them come to room temperature for about 15-20 minutes before serving, the cake tastes best when it’s not super cold. Freezing is also an option for unfrosted cupcakes wrap them well and they’ll keep for a month. Frosting can be frozen separately too!

Making Halloween Ghost Cupcakes Your Own: Ingredient Substitutions
Honestly, I’m all for playing around with recipes. For the buttermilk, if you’re out, just add a tablespoon of white vinegar or lemon juice to regular milk and let it sit for 5 minutes. Works perfectly, I do it all the time! If you’re not a fan of vanilla, almond extract gives a lovely, slightly different flavor profile I tried that once, and it worked, kinda, just a bit stronger. For the ghost eyes, mini chocolate chips are classic, but edible googly eyes are a super fun alternative. You could even use small candies or bits of licorice. I once tried to use melted white chocolate for the eyes, but it was a bit too messy and didn’t set as cleanly. Stick to something solid if you want crisp eyes!
Serving Up Halloween Ghost Cupcakes
These Halloween Ghost Cupcakes are pretty much a party in themselves, but they do love a good companion! I usually serve them alongside a big bowl of popcorn for a spooky movie marathon Hocus Pocus, anyone? For drinks, a simple glass of milk is classic, but a fun, vibrant punch (maybe with some gummy worms floating in it!) really ups the festive factor. If you’re feeling extra, a scoop of vanilla bean ice cream on the side can be a dreamy addition, though it does make things a little messier. They’re also fantastic as part of a larger dessert spread, maybe next to some candy corn and chocolate spiders. They just bring that perfect touch of playful spookiness to any gathering.
The Story Behind These Halloween Ghost Cupcakes
Halloween has always been a big deal in my family. Not just for the trick-or-treating, but for the anticipation of cozy nights in, watching old monster movies, and, of course, baking something spooky. These Halloween Ghost Cupcakes became a tradition after a particularly disastrous attempt at a layered monster cake that collapsed into a green puddle. I needed something simple, something that still felt festive but wouldn’t cause a kitchen meltdown. The idea for ghosts just popped into my head, and honestly, they’ve been a staple ever since. They represent that sweet, innocent fun of Halloween for me, no complicated ghouls or gory details, just sweet little spirits ready to bring a smile. They’re my little nod to the magic of the season, a reminder that sometimes the simplest treats are the most beloved.
Honestly, every time I make these Halloween Ghost Cupcakes, I feel like a kid again. They’re just so charming and bring such a simple joy to the season. Watching everyone’s faces light up when they see these little spooky treats? That’s what it’s all about. I hope you give them a whirl and let your inner kid run wild in the kitchen. Don’t forget to share your ghost creations with me I love seeing your kitchen adventures!

Halloween Ghost Cupcakes FAQs
- → Can I use a boxed cake mix for these Halloween Ghost Cupcakes?
Absolutely! I’ve totally done it when I’m short on time. Just follow the box directions for baking the cupcakes, then use my frosting recipe. It’s a fantastic shortcut and still delivers those adorable spooky ghosts!
- → What if I don’t have buttermilk for the cupcakes?
No worries! Just add 1 tablespoon of white vinegar or lemon juice to a liquid measuring cup, then fill it up to 1 cup with regular milk. Let it sit for 5 minutes, it’ll curdle slightly, and that’s your homemade buttermilk. I use this trick all the time.
- → My frosting isn’t holding its shape for the ghosts, what went wrong?
Oh, I’ve been there! It usually means your butter wasn’t firm enough, or you need more powdered sugar. Try adding a tablespoon or two more powdered sugar and beating it again until it’s nice and stiff. Cold heavy cream helps too!
- → How far in advance can I make these Halloween Ghost Cupcakes?
You can bake the cupcakes 1-2 days ahead and store them unfrosted in an airtight container. Make the frosting the day of, or even a day ahead and store it in the fridge, then re-whip it briefly before piping. I wouldn’t frost them more than a day in advance for the freshest taste.
- → Can I make these chocolate Halloween Ghost Cupcakes instead of vanilla?
Yes, absolutely! Just swap out your favorite chocolate cupcake recipe for the base, and then use my vanilla buttercream recipe for the ghost frosting. Chocolate and vanilla are always a winning combo, and your ghosts will be even spookier!

Spooky Halloween Ghost Cupcakes: Fun & Simple Treats
- Prep Time: 30 Minutes
- Cook Time: 20 Minutes
- Total Time: 50 Minutes
- Yield: 12 Servings 1x
- Category: Breakfast
Description
Bake adorable Halloween Ghost Cupcakes! This easy recipe brings spooky fun to your kitchen with fluffy cupcakes and whimsical ghost frosting.
Ingredients
- Cupcake Base:
- 1 ½ cups (180g) all-purpose flour
- 1 ½ cups (300g) granulated sugar
- 1 ½ tsp baking powder
- ½ tsp baking soda
- ½ tsp salt
- ½ cup (113g) unsalted butter, softened
- 2 large eggs, room temperature
- 1 tsp vanilla extract
- ¾ cup (180ml) buttermilk, room temperature
- Spooky Frosting:
- 1 cup (226g) unsalted butter, softened
- 4–5 cups (480-600g) powdered sugar, sifted
- ¼ cup (60ml) heavy cream
- 1 tsp vanilla extract
- Ghostly Decorations:
- 24 mini chocolate chips (for eyes)
- Optional Extras:
- Edible googly eyes (for extra fun)
- A drop of orange or green food coloring for festive frosting accents
Instructions
- Prep Your Oven & Dry Ingredients: Preheat your oven to 350°F (175°C) and line a 12-cup muffin tin with paper liners. In a medium bowl, whisk together the all-purpose flour, granulated sugar, baking powder, baking soda, and salt. Give it a good whisk until everything is combined. I always imagine I’m mixing up a little bit of magic potion here, honestly. This step is pretty straightforward, but making sure it’s all evenly distributed helps avoid those weird pockets of unmixed ingredients later on. You want a consistent, fluffy base for your Halloween Ghost Cupcakes.
- Cream the Wet Ingredients: In a separate, larger bowl, or your stand mixer, cream together the softened unsalted butter and granulated sugar until it’s light and fluffy. This usually takes a good 2-3 minutes. Then, beat in the eggs one at a time, making sure each is fully incorporated before adding the next. Don’t rush this part! I once got impatient and added all the eggs at once, and the mixture looked a bit curdled. Oops! It still baked up okay, but it wasn’t as smooth.
- Combine and Alternate: Now for the main event! Gradually add your dry ingredients to the wet ingredients, alternating with the buttermilk. Start and end with the dry ingredients. Mix until just combined – overmixing is the enemy of tender cupcakes, I’ve learned that the hard way. The batter should look smooth and creamy, smelling faintly of vanilla and sweet goodness. This is where the magic really starts to happen for these Halloween Ghost Cupcakes!
- Bake Those Beauties: Fill each cupcake liner about two-thirds full with batter. Pop them into your preheated oven at 350°F (175°C) for 18-22 minutes. Keep an eye on them! A toothpick inserted into the center should come out clean. My kitchen always smells incredible at this point, like a warm, sugary cloud. Let them cool in the tin for a few minutes before transferring to a wire rack to cool completely. Patience is a virtue here, trust me.
- Whip Up the Ghostly Frosting: While your cupcakes are cooling, let’s make that dreamy frosting. In a large bowl, beat the softened butter until creamy. Gradually add the sifted powdered sugar, a little at a time, mixing until smooth. Then, pour in the heavy cream and vanilla extract. Beat on high until the frosting is light, fluffy, and holds stiff peaks. This is the fun part where your frosting transforms into something wonderfully pipeable. If it feels too thick, a tiny splash more cream can fix it; too thin, more powdered sugar! My first attempt was so runny, my ghosts looked like they were having a bad day.
- Decorate Your Halloween Ghost Cupcakes: Once the cupcakes are completely cool, transfer your frosting to a piping bag fitted with a large round tip (or just snip the corner off a Ziploc bag, I do it all the time!). Pipe a tall swirl of frosting onto each cupcake, pulling up at the top to create a ghost shape. Then, carefully place two mini chocolate chips for eyes. Honestly, watching them come to life is just the sweetest thing. They’ll look spooky and adorable, ready for their Halloween debut!


