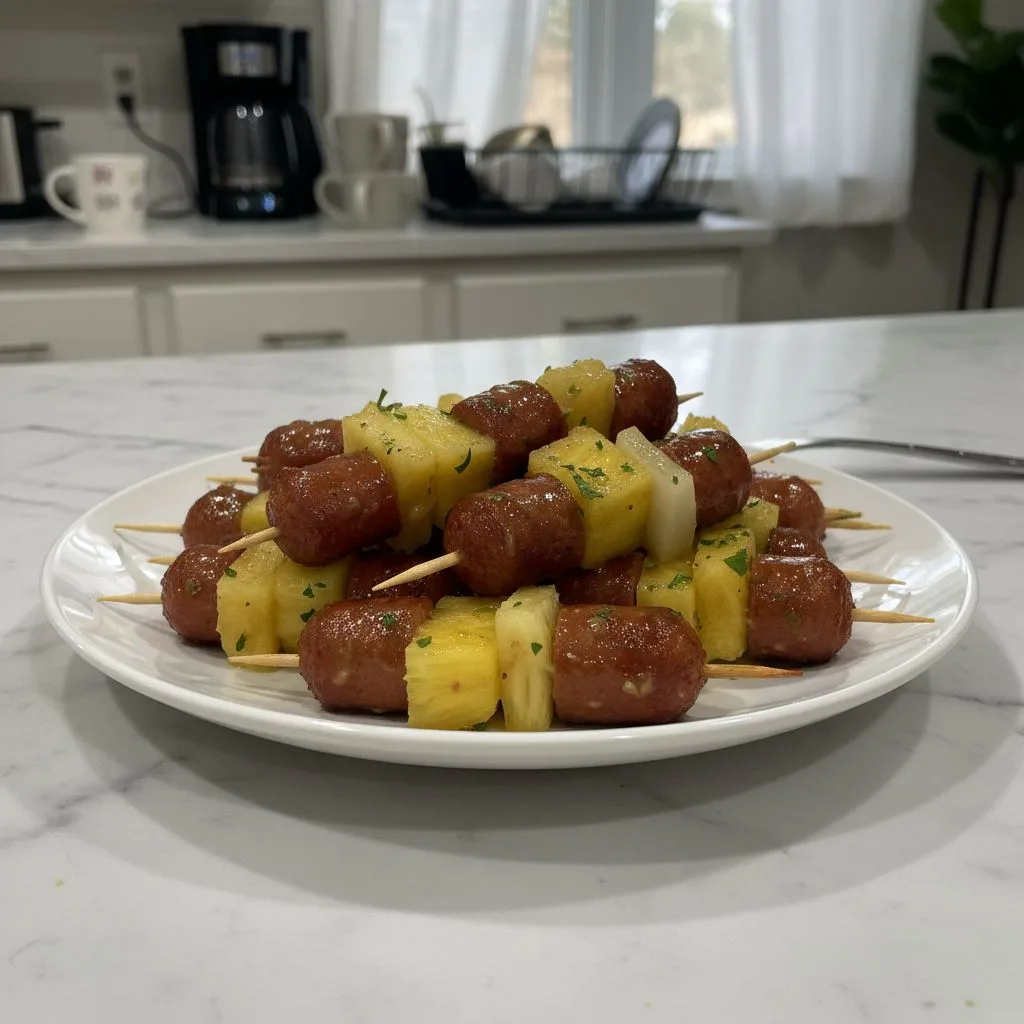
You know those last-minute gatherings? The ones where someone texts, “Hey, popping over in an hour, got anything?” Yeah, those. I used to panic, honestly. My kitchen would turn into a whirlwind of “what can I cobble together?” One particularly chaotic evening, I had some kielbasa in the fridge and a lonely can of pineapple. I didn’t expect that combining them would spark such joy, but here we are! These Kielbasa Pineapple Appetizers became my secret weapon for turning chaos into a delicious, sweet-and-savory triumph. They’re just so comforting, and everyone always asks for the recipe.
I remember the first time I made these Kielbasa Pineapple Appetizers for a real crowd. I was so proud, meticulously arranging them on a platter. Then, my youngest, bless his heart, snuck in, grabbed a handful, and declared, “Mama, these are like candy!” before disappearing. Half the platter was gone before anyone else even got a look in! Oops. It was a messy, sticky moment, but it proved just how irresistible they are.
Ingredients for Kielbasa Pineapple Appetizers
- Smoked Kielbasa Sausage: This is our star, the savory backbone! Get a fully cooked one, hon, it saves so much time. I usually grab a good quality beef or pork kielbasa the flavor just pops. Don’t use those super-thin breakfast sausages, it just won’t be the same.
- Canned Pineapple Chunks (in juice): You want chunks, not crushed or rings, for that perfect bite. Make sure to drain them really well, soggy appetizers are a no-go. I tried fresh once, and it was okay, but the canned ones caramelize better, honestly.
Brown Sugar: This is where the magic happens for our sticky, sweet glaze. Light or dark brown sugar works I usually use light because that’s what’s always in my pantry. More garlic? Less salt? For this, I actually stick to the recipe, but if you like things sweeter, a little extra won’t hurt!
Apple Cider Vinegar: Don’t skip this! It cuts through the sweetness and richness, adding a much-needed tang. I forgot it once, and the appetizers were just… flat. It’s a small amount, but it makes a huge difference, trust me.
Dijon Mustard: This might sound weird, but it adds a subtle, sophisticated depth to the glaze. It’s not about making it taste like mustard, it’s about that savory kick. I use a good quality Dijon, nothing fancy, but it just elevates the whole thing.
- Red Pepper Flakes (Optional): For those of us who like a tiny bit of heat! A pinch just wakes everything up. I always add them because my family loves a little zing, but if you’re sensitive to spice, totally leave them out.
- Fresh Parsley (Optional Garnish): Just a little sprinkle at the end for color and freshness. It makes these bites look fancy, even if you just threw them together in 20 minutes. I love how the green pops against the golden glaze.
Cooking Kielbasa Pineapple Appetizers
- Prep Your Stars:
- First things first, let’s get that kielbasa ready. Slice it into nice, bite-sized rounds, about half an inch thick. You want them chunky enough to hold their own against the pineapple. Then, grab those canned pineapple chunks and drain them really, really well. I usually press them between a few sheets of paper towel to get out as much juice as possible. This is where I always forget to pat them dry, and then I get a slightly watery glaze oops! Just be thorough here.
- Whip Up That Sticky Glaze:
- Now for the good stuff! In a medium bowl, whisk together the brown sugar, apple cider vinegar, and Dijon mustard. You’re aiming for a smooth, slightly thick sauce. This is what’s going to coat our bites and give them that irresistible shine. I once tried to just sprinkle the sugar and pour the vinegar, and it was a sticky, lumpy mess. Whisking it all together first is key, trust me on this one!
- Combine and Coat:
- Add your sliced kielbasa and drained pineapple chunks to the bowl with the glaze. Give it a good stir, making sure everything is evenly coated. You want every piece of kielbasa and pineapple to be shimmering with that sweet and tangy sauce. It’s looking good already, right? I love how the pineapple smells tangy and sweet even before cooking. If you’re using red pepper flakes, toss them in now for that little kick!
- Bake to Perfection (or Sauté!):
- Spread the coated kielbasa and pineapple onto a baking sheet in a single layer. You don’t want to overcrowd the pan, or they’ll steam instead of caramelize. Pop it into a preheated oven at 375°F (190°C) for about 15-20 minutes, or until the sauce is bubbly and starting to thicken. If you prefer, you can also sauté them in a large skillet over medium heat, stirring occasionally, until glazed and heated through that’s my speedy weeknight method, honestly.
- Stir and Glaze Again:
- Halfway through the baking (around 10 minutes), take the tray out and give everything a good stir. This helps ensure all sides get that beautiful caramelization for these bites. You’ll see the glaze getting stickier and darker, which is exactly what we want. Sometimes I forget this step, and then I have some pieces that are perfectly glazed and others that are a bit sad don’t be like me!
- Serve and Enjoy!:
- Once they’re done, these appetizers should be glistening, sticky, and smelling absolutely divine. The pineapple will be tender, and the kielbasa slightly browned. Transfer them to a serving platter. If you have any fresh parsley, sprinkle it over the top for a fresh finish. They’re best served warm, but honestly, they disappear quickly at any temperature! Don’t be surprised if they’re gone in minutes.
There was one time I was making these bites for a family reunion, and the oven decided to act up. Total kitchen chaos! I ended up having to quickly transfer everything to a giant skillet and finish them on the stovetop. It worked out, honestly, but my kitchen looked like a disaster zone. Everyone still raved about them, though. It just goes to show, sometimes the best recipes can handle a little improvisation!
Storage Tips for Kielbasa Pineapple Appetizers
Okay, so if you actually have any leftovers (which is rare in my house, to be real), these Kielbasa Pineapple Appetizers store pretty well. Just pop them into an airtight container and keep them in the fridge for up to 3-4 days. When reheating, I’ve found the best way is actually in a skillet over medium-low heat. That way, the glaze can re-caramelize a bit, and the kielbasa gets slightly crispy again. I microwaved it once, and the sauce got a bit watery and separated so don’t do that, lol. They’re still edible, but not nearly as good. Honestly, they even taste decent cold if you’re in a pinch!
https://www.tastecurious.com/wp-content/uploads/2025/09/kielbasa-pineapple-appetizers-that-everyone-will-crave-blog-image-1.webp
Ingredient Substitutions for Kielbasa Pineapple Appetizers
Life happens, and sometimes you don’t have exactly what the recipe calls for, right? For the kielbasa, you could try a smoked sausage or even a chicken apple sausage if you’re looking for something a bit leaner I tried that once, and it worked, kinda, but the classic kielbasa has that perfect texture. If you don’t have canned pineapple, fresh pineapple chunks will work, but they might release a bit more liquid, so you might need to cook them a tad longer to get that sticky glaze. I’ve also swapped brown sugar for maple syrup in a pinch, and it gave a lovely, slightly different sweetness. For the apple cider vinegar, white wine vinegar could work, but it lacks that distinct tang. Honestly, experiment a little! That’s how we find new favorites.
Serving Your Kielbasa Pineapple Appetizers
These bites are fantastic on their own, speared with a toothpick for easy grabbing at a party. But if you want to make them a little more substantial, they’re surprisingly good over a bed of fluffy white rice the glaze acts as a fantastic sauce! For drinks, a crisp, dry white wine or even a ginger ale pairs beautifully with the sweet and savory notes. My personal favorite pairing? A cozy movie night with these and a silly rom-com. It’s a match made in heaven, honestly. They also make a great addition to a brunch spread, alongside some scrambled eggs and maybe some crispy bacon. So versatile!
The Backstory of Kielbasa Pineapple Appetizers
You know, while Kielbasa, with its Polish roots, and pineapple, a tropical fruit, don’t traditionally share a plate, this combination really speaks to that beautiful American potluck tradition. It’s about bringing together diverse flavors and making something totally new and universally loved. For me, these bites became a staple during our family game nights. My grandma, who was a stickler for traditional recipes, was skeptical at first, but after one bite, even she was asking for more. It’s funny how food can create new traditions and bridge gaps, isn’t it? This dish, for me, is all about easy comfort and unexpected joy.
Honestly, these Kielbasa Pineapple Appetizers have saved me from so many last-minute party panics and brought so much simple joy to my kitchen. There’s something so satisfying about watching people’s eyes light up when they try this sweet and savory combo. It’s not fancy, it’s just real, comforting food. I hope you give them a whirl and maybe even create your own little kitchen memory. Let me know how your batch turns out!
https://www.tastecurious.com/wp-content/uploads/2025/09/kielbasa-pineapple-appetizers-that-everyone-will-crave-blog-image-2.webp
Frequently Asked Questions
- → Can I make these Kielbasa Pineapple Appetizers ahead of time?
Absolutely! You can prep the kielbasa and pineapple, whisk the glaze, and store them separately. Then, just combine and bake right before serving. I often do this for parties to save myself some last-minute stress. It’s a lifesaver!
- → What kind of kielbasa works best for these bites?
I usually go for a fully cooked, smoked beef or pork kielbasa. The flavor is robust enough to stand up to the sweet pineapple. I’ve tried turkey kielbasa, and it’s okay, but it lacks that rich, smoky depth that makes these so good, honestly.
- → My glaze isn’t getting sticky enough, what gives?
Oops, been there! Make sure you’re not overcrowding the pan, as that can cause steaming instead of caramelization. Also, ensure your pineapple is well-drained. If it’s still too thin, a few extra minutes in the oven or a quick sauté on the stovetop can help thicken it up. Don’t worry, it’s fixable!
- → How long do these appetizers last in the fridge?
If you manage to have any left, they’ll keep well in an airtight container for about 3-4 days. I find they’re best reheated gently in a skillet to bring back some of that sticky crispiness. Cold is fine too, but not quite the same as fresh out of the oven.
- → Can I add other ingredients to these appetizers?
Oh, for sure! I’ve seen people add bell peppers for extra color, or even a splash of orange juice to the glaze for a citrusy twist. Sometimes I throw in some onion wedges. Experiment and see what you love! That’s the fun part of cooking, right?
Kielbasa Pineapple Appetizers: Sweet & Savory Bites
- Prep Time: 10 Minutes
- Cook Time: 25 Minutes
- Total Time: 35 Minutes
- Yield: 10 Servings 1x
- Category: High Proteins Meals
Description
Kielbasa Pineapple Appetizers bring a sweet and savory zing to any gathering. Discover this easy, crowd-pleasing recipe with a personal twist.
Ingredients
- Main Ingredients:
- 1 lb (approx. 450g) fully cooked smoked kielbasa sausage, sliced into ½-inch rounds
- 1 (20 oz / 567g) can pineapple chunks in juice, well-drained
- Flavor Boosters:
- ½ cup (100g) light or dark brown sugar, packed
- ¼ cup (60ml) apple cider vinegar
- 1 tbsp (15g) Dijon mustard
- Optional Extras:
- ½ tsp red pepper flakes (for a touch of heat)
- 2 tbsp fresh parsley, chopped (for garnish)
Instructions
- Prep Your Stars:: First things first, let’s get that kielbasa ready. Slice it into nice, bite-sized rounds, about half an inch thick. You want them chunky enough to hold their own against the pineapple. Then, grab those canned pineapple chunks and drain them really, really well. I usually press them between a few sheets of paper towel to get out as much juice as possible. This is where I always forget to pat them dry, and then I get a slightly watery glaze – oops! Just be thorough here.
- Whip Up That Sticky Glaze:: Now for the good stuff! In a medium bowl, whisk together the brown sugar, apple cider vinegar, and Dijon mustard. You’re aiming for a smooth, slightly thick sauce. This is what’s going to coat our bites and give them that irresistible shine. I once tried to just sprinkle the sugar and pour the vinegar, and it was a sticky, lumpy mess. Whisking it all together first is key, trust me on this one!
- Combine and Coat:: Add your sliced kielbasa and drained pineapple chunks to the bowl with the glaze. Give it a good stir, making sure everything is evenly coated. You want every piece of kielbasa and pineapple to be shimmering with that sweet and tangy sauce. It’s looking good already, right? I love how the pineapple smells tangy and sweet even before cooking. If you’re using red pepper flakes, toss them in now for that little kick!
- Bake to Perfection (or Sauté!):: Spread the coated kielbasa and pineapple onto a baking sheet in a single layer. You don’t want to overcrowd the pan, or they’ll steam instead of caramelize. Pop it into a preheated oven at 375°F (190°C) for about 15-20 minutes, or until the sauce is bubbly and starting to thicken. If you prefer, you can also sauté them in a large skillet over medium heat, stirring occasionally, until glazed and heated through – that’s my speedy weeknight method, honestly.
- Stir and Glaze Again:: Halfway through the baking (around 10 minutes), take the tray out and give everything a good stir. This helps ensure all sides get that beautiful caramelization for these bites. You’ll see the glaze getting stickier and darker, which is exactly what we want. Sometimes I forget this step, and then I have some pieces that are perfectly glazed and others that are a bit sad – don’t be like me!
- Serve and Enjoy!:: Once they’re done, these appetizers should be glistening, sticky, and smelling absolutely divine. The pineapple will be tender, and the kielbasa slightly browned. Transfer them to a serving platter. If you have any fresh parsley, sprinkle it over the top for a fresh finish. They’re best served warm, but honestly, they disappear quickly at any temperature! Don’t be surprised if they’re gone in minutes.

