Honestly, these Maple BBQ Hasselback Kielbasa Bites started as a happy accident. I remember one frantic Tuesday evening, my fridge was looking sparse, and I had friends dropping by spontaneously. All I had was some kielbasa in the back of the fridge and a half-empty bottle of maple syrup. I was just trying to make something, anything, to snack on. The idea of slicing them Hasselback-style just popped into my head, and I didn’t expect that sweet, smoky aroma to fill my tiny kitchen like it did. Suddenly, my kitchen chaos felt less like a mess and more like a cozy, impromptu feast. These bites became a little piece of magic for those last-minute gatherings.
The first time I made these Maple BBQ Hasselback Kielbasa Bites, I got a little too enthusiastic with the knife. I mean, I really wanted those deep cuts! Ended up slicing straight through about half of them. Oops! My kitchen counter looked like a kielbasa crime scene, but hey, it was a learning experience. The “broken” bites were just as delicious, though, maybe even more so because they had extra surface area for that yummy sauce. It’s a reminder that kitchen imperfections often lead to the tastiest discoveries.

Ingredients for Maple BBQ Hasselback Kielbasa Bites
Kielbasa & Prep
- Smoked Kielbasa: This is our star, obviously! I always grab a good quality smoked kielbasa, it’s got that savory foundation that just works so well with sweet. Don’t go for anything too lean, the fat renders beautifully.
- Olive Oil: Just a drizzle, honestly, to help everything crisp up and get that lovely golden color. I’ve tried other oils, but a good olive oil just adds a nice subtle flavor.
Sweet & Smoky Sauce
- Maple Syrup: Use real maple syrup, hon, not the pancake stuff. The real deal makes all the difference in these Maple BBQ Hasselback Kielbasa Bites. It’s that rich, earthy sweetness we’re after.
- BBQ Sauce: Your favorite store-bought or homemade will do! I’m a sucker for a smoky, slightly tangy BBQ sauce. I tried a super sweet one once, and it was a bit much, so balance is key.
Apple Cider Vinegar: Just a splash to cut through the richness and add a little zing. It brightens up the whole sauce, I swear!
Smoked Paprika: Oh, this is my secret weapon for extra depth and that gorgeous, warm color. More is more for me, but start with a teaspoon if you’re shy.
For Serving
- Fresh Parsley: A little sprinkle at the end for color and freshness. It just makes the Maple BBQ Hasselback Kielbasa Bites look fancy, even if they’re super easy.
- Toothpicks/Skewers: Essential for serving! Makes them easy to grab and keeps fingers clean.
Instructions for Maple BBQ Hasselback Kielbasa Bites
- Prep Your Kielbasa:
- First things first, let’s get those kielbasa ready for their Hasselback moment. Grab a cutting board and two wooden spoons or chopsticks. Lay a kielbasa between them, this trick keeps you from slicing all the way through! Make thin, even cuts about 1/8 to 1/4 inch apart, going about two-thirds of the way down. I always take a deep breath here, because this is where I tend to get a bit wobbly, leading to those aforementioned kitchen mishaps. Just go slow, you’ve got this!
- Drizzle and Arrange the Maple BBQ Hasselback Kielbasa Bites:
- Once your kielbasa are beautifully sliced, drizzle them with a little olive oil. Gently rub it all over, making sure it gets into those cuts. This helps them crisp up later, trust me. Now, arrange them on a baking sheet lined with parchment paper. Give them some space, because nobody likes crowded kielbasa! I’ve learned that overcrowding means they steam instead of roast, and we want glorious caramelization here, not soggy sausages.
- Whip Up the Maple BBQ Sauce:
- In a small bowl, whisk together your maple syrup, BBQ sauce, apple cider vinegar, and smoked paprika. Give it a good stir until it’s all happy and combined. Take a little taste is it sweet enough? Smoky enough? This is your chance to tweak it! I once added a tiny pinch of cayenne here, and wow, it gave these Maple BBQ Hasselback Kielbasa Bites a really unexpected kick. Don’t be afraid to make it your own!
- First Bake & Sauce Application:
- Pop your baking sheet with the kielbasa into a preheated oven at 400°F (200°C) for 15 minutes. This gives them a head start on getting crispy. After 15 minutes, pull them out, and brush about half of your glorious maple BBQ sauce all over the kielbasa, making sure to get it into all those little crevices. The smell at this point? Oh, it’s just heavenly. That sweet and savory aroma starts to really fill the kitchen, and my stomach usually starts rumbling.
- Second Bake & More Sauce for Maple BBQ Hasselback Kielbasa Bites:
- Return the kielbasa to the oven for another 10-15 minutes. Keep an eye on them! You want that sauce to caramelize and get sticky, but not burn. Halfway through this second bake, pull them out again and brush with the remaining maple BBQ sauce. This double application of sauce is key for maximum flavor and that gorgeous glaze. I’ve forgotten this step once or twice, and the bites just weren’t as deeply flavored, so don’t skip it!
- Garnish and Serve:
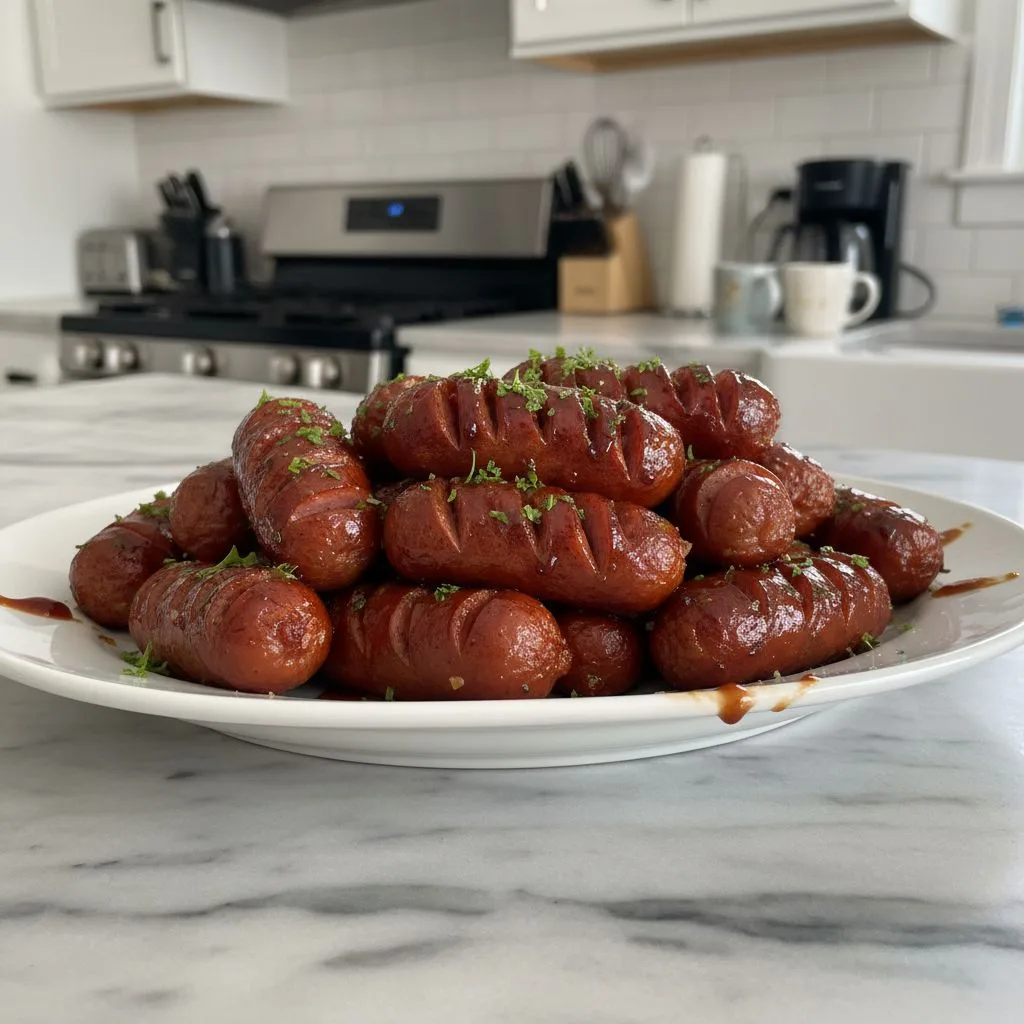
- Once your Maple BBQ Hasselback Kielbasa Bites are beautifully caramelized and sticky, remove them from the oven. Let them cool for just a few minutes they’ll be piping hot! Transfer them to a serving platter, sprinkle with fresh chopped parsley for a pop of color, and insert toothpicks into each bite. They should look golden, glistening, and utterly irresistible. Honestly, this is where the magic happens, they look so impressive, but we know how easy they were!
There’s something so satisfying about seeing those little Hasselback cuts fan out as the kielbasa cooks, soaking up all that sweet and smoky sauce. It reminds me of a time I was trying to impress my niece with a “fancy” dinner, and these Maple BBQ Hasselback Kielbasa Bites totally delivered. She thought I was a gourmet chef, and I just smiled, remembering my clumsy knife work. It’s moments like those, turning simple ingredients into something special, that make cooking so much fun.

Storage Tips
If you somehow manage to have any of these Maple BBQ Hasselback Kielbasa Bites left over (a rare occurrence in my house, honestly!), they store surprisingly well. Just pop them into an airtight container and stash them in the fridge. They’ll be good for about 3-4 days. I’ve tried microwaving them once, and the sauce got a little watery, which wasn’t my favorite, so don’t do that lol. My personal tip? Reheat them gently in an air fryer at about 350°F (175°C) for 5-7 minutes. It brings back that lovely crispness and caramelization without drying them out. They’re also pretty good cold, actually, straight from the fridge for a quick snack, especially if you’re into that kind of thing!

Ingredient Substitutions for Maple BBQ Hasselback Kielbasa Bites
I’m all about experimenting in the kitchen, and I’ve tried a few swaps with these Maple BBQ Hasselback Kielbasa Bites. For the kielbasa, if you can’t find smoked, a good quality unsmoked pork sausage or even a chicken apple sausage would work, just know the flavor profile will be a little different. I once used a spicy Italian sausage, and it added a fantastic kick, but then I had to adjust the BBQ sauce to be less sweet. As for the maple syrup, you could try honey for a similar sweetness, but you’d lose that distinct maple flavor that really makes these special. I’ve also experimented with different BBQ sauces a Carolina gold mustard-based sauce was interesting, but the classic smoky tomato-based one is still my favorite for these bites. Don’t be afraid to play around with the spices in the sauce either, a pinch of garlic powder or onion powder can add extra layers of flavor!
Serving Suggestions
These Maple BBQ Hasselback Kielbasa Bites are so versatile! For a casual get-together, I just arrange them on a big platter with extra toothpicks, maybe a little bowl of extra BBQ sauce for dipping. If I’m feeling a bit more ambitious, they’re fantastic alongside a creamy potato salad or a crisp coleslaw, the cool, tangy sides really balance out the rich, sweet kielbasa. For a cozy night in, honestly, these and a good rom-com? Yes please. They also make a surprisingly good addition to a breakfast-for-dinner spread alongside some scrambled eggs and toast. Sometimes, I even serve them with some steamed green beans or roasted asparagus for a little freshness. They’re savory, sweet, and always a crowd-pleaser, no matter the occasion!
Cultural Backstory of Kielbasa & Maple BBQ Hasselback Kielbasa Bites
Kielbasa, with its rich Eastern European roots, especially from Poland, has such a hearty, comforting history. It’s a sausage that really speaks to tradition and robust flavors. My grandma, bless her heart, used to make her own kielbasa from scratch, and the smell of it cooking always brings me back to her bustling kitchen. While these Maple BBQ Hasselback Kielbasa Bites aren’t exactly traditional Polish fare, they’re a fun, modern twist on a beloved classic. The Hasselback technique, though often associated with potatoes, just transforms the humble kielbasa into something elegant and perfect for soaking up a delicious sauce. It’s a beautiful way to honor the ingredient’s heritage while adding a touch of contemporary flavor, making it a new favorite in my family’s recipe book.
Making these Maple BBQ Hasselback Kielbasa Bites always feels like a little kitchen victory. They turn out so gorgeous and tasty, and honestly, they’re so simple. It’s the kind of dish that brings smiles and happy sighs, and isn’t that what home cooking is all about? I hope you give them a try and maybe even create your own little kitchen memory. Let me know how your bites turn out!
Frequently Asked Questions
- → Can I make Maple BBQ Hasselback Kielbasa Bites ahead of time?
You can definitely prep the kielbasa by slicing it a day ahead and keeping it in the fridge. The sauce can also be made in advance. I find baking them fresh is best for that crispy, sticky texture, but you can certainly do the initial prep!
- → What kind of kielbasa works best for these Maple BBQ Hasselback Kielbasa Bites?
I usually go for a fully cooked, smoked pork kielbasa. It holds its shape well and has a robust flavor that pairs beautifully with the maple BBQ. Just make sure it’s not too soft, or the Hasselback cuts can be tricky.
- → My Maple BBQ Hasselback Kielbasa Bites sauce burned a little. What went wrong?
Oh, I’ve done that! Maple syrup has a high sugar content, so it can caramelize quickly. Next time, try baking at a slightly lower temperature or covering loosely with foil during the last few minutes if it’s getting too dark.
- → How do I store leftover Maple BBQ Hasselback Kielbasa Bites?
Leftovers should be stored in an airtight container in the refrigerator for up to 3-4 days. For reheating, I swear by the air fryer to bring back that lovely crispness without drying them out. Avoid the microwave if you can!
- → Can I add a little heat to these Maple BBQ Hasselback Kielbasa Bites?
Absolutely! I often add a pinch of cayenne pepper or a dash of hot sauce to the BBQ mixture for a spicy kick. You could also use a spicier BBQ sauce. Experiment and find what you love!

Maple BBQ Hasselback Kielbasa Bites: Sweet & Smoky Skewers
- Prep Time: 15 Minutes
- Cook Time: 30 Minutes
- Total Time: 45 Minutes
- Yield: 6 Servings 1x
- Category: Easy dinners
Description
Maple BBQ Hasselback Kielbasa Bites bring sweet, smoky flavor to your table. Easy to make, these savory skewers are a crowd-pleaser for any gathering.
Ingredients
- Kielbasa & Prep:
- 2 lbs smoked kielbasa, fully cooked
- 1 tbsp olive oil
- Sweet & Smoky Sauce:
- 1/2 cup pure maple syrup
- 1/2 cup your favorite BBQ sauce
- 1 tbsp apple cider vinegar
- 1 tsp smoked paprika
- For Serving:
- 2 tbsp fresh parsley, chopped (for garnish)
- Toothpicks or small skewers
Instructions
- Prep Your Kielbasa:: First things first, let’s get those kielbasa ready for their Hasselback moment. Grab a cutting board and two wooden spoons or chopsticks. Lay a kielbasa between them; this trick keeps you from slicing all the way through! Make thin, even cuts about 1/8 to 1/4 inch apart, going about two-thirds of the way down. I always take a deep breath here, because this is where I tend to get a bit wobbly, leading to those aforementioned kitchen mishaps. Just go slow, you’ve got this!
- Drizzle and Arrange the Maple BBQ Hasselback Kielbasa Bites:: Once your kielbasa are beautifully sliced, drizzle them with a little olive oil. Gently rub it all over, making sure it gets into those cuts. This helps them crisp up later, trust me. Now, arrange them on a baking sheet lined with parchment paper. Give them some space, because nobody likes crowded kielbasa! I’ve learned that overcrowding means they steam instead of roast, and we want glorious caramelization here, not soggy sausages.
- Whip Up the Maple BBQ Sauce:: In a small bowl, whisk together your maple syrup, BBQ sauce, apple cider vinegar, and smoked paprika. Give it a good stir until it’s all happy and combined. Take a little taste – is it sweet enough? Smoky enough? This is your chance to tweak it! I once added a tiny pinch of cayenne here, and wow, it gave these Maple BBQ Hasselback Kielbasa Bites a really unexpected kick. Don’t be afraid to make it your own!
- First Bake & Sauce Application:: Pop your baking sheet with the kielbasa into a preheated oven at 400°F (200°C) for 15 minutes. This gives them a head start on getting crispy. After 15 minutes, pull them out, and brush about half of your glorious maple BBQ sauce all over the kielbasa, making sure to get it into all those little crevices. The smell at this point? Oh, it’s just heavenly. That sweet and savory aroma starts to really fill the kitchen, and my stomach usually starts rumbling.
- Second Bake & More Sauce for Maple BBQ Hasselback Kielbasa Bites:: Return the kielbasa to the oven for another 10-15 minutes. Keep an eye on them! You want that sauce to caramelize and get sticky, but not burn. Halfway through this second bake, pull them out again and brush with the remaining maple BBQ sauce. This double application of sauce is key for maximum flavor and that gorgeous glaze. I’ve forgotten this step once or twice, and the bites just weren’t as deeply flavored, so don’t skip it!
- Garnish and Serve:: Once your Maple BBQ Hasselback Kielbasa Bites are beautifully caramelized and sticky, remove them from the oven. Let them cool for just a few minutes – they’ll be piping hot! Transfer them to a serving platter, sprinkle with fresh chopped parsley for a pop of color, and insert toothpicks into each bite. They should look golden, glistening, and utterly irresistible. Honestly, this is where the magic happens; they look so impressive, but we know how easy they were!


