Description
Whip up this easy No-Bake Key Lime Pie! Tangy, sweet, and perfectly creamy, it’s my simple secret for a refreshing dessert without turning on the oven.
Ingredients
Scale
- Crust Essentials:
- 1 ½ cups (about 10–12 full sheets) graham cracker crumbs
- ⅓ cup unsalted butter, melted
- Creamy Filling Stars:
- 1 (14-ounce) can sweetened condensed milk
- ½ cup freshly squeezed key lime juice (about 8–10 key limes)
- 1 ½ cups cold heavy cream
- ¼ cup powdered sugar
- Flavor Boosters & Finishes:
- 1 tablespoon key lime zest (from about 2–3 key limes)
- ½ teaspoon vanilla extract
Instructions
- Crush and Press the Crust:: First things first, let’s get that crust going. I usually grab a rolling pin and smash those graham crackers in a Ziploc bag—it’s oddly therapeutic, you know? Or, if I’m feeling fancy, the food processor does the trick in seconds. Melt your butter, then mix it into the crumbs until it looks like wet sand. Press it firmly into your pie dish; I always use the bottom of a measuring cup to get it really compact. Don’t skip this part; a flimsy crust is no fun. Pop it in the fridge while you get the filling ready. You want it nice and firm.
- Whip the Cream to Stiff Peaks:: Now for the fluffy stuff! Get out your electric mixer and pour in that cold heavy cream. Add the powdered sugar and vanilla extract. Start on low, then gradually increase to high speed. Watch it closely; you’re looking for stiff peaks, where the cream holds its shape beautifully. I’ve definitely over-whipped it before, turning it into butter, oops! So, keep an eye on it. This step is where the filling gets its airy texture, so take your time and don’t rush it. It should smell subtly sweet and creamy, honestly.
- Combine the Key Lime Filling:: In a separate, medium bowl, whisk together the sweetened condensed milk, key lime juice, and a generous amount of key lime zest. You’ll notice it thickens almost immediately—that’s the magic happening! The acidity of the lime juice reacts with the condensed milk, creating that classic creamy, dense texture. I always give it a good sniff; that bright, tangy lime aroma is just heavenly. Make sure everything is well combined and smooth, no lumps allowed!
- Gently Fold in the Whipped Cream:: This is where we bring the two components together. Take about a third of your whipped cream and fold it into the lime mixture to lighten it. Then, gently fold in the remaining whipped cream, being careful not to deflate all that lovely air you just whipped in. You want to maintain that light, airy texture for your No-Bake Key Lime Pie. I’ve been too aggressive before, and the pie ended up a bit too dense. Keep it light and fluffy!
- Fill the Crust and Chill:: Pour your perfectly creamy No-Bake Key Lime Pie filling into your chilled graham cracker crust. Use a spatula to spread it evenly, making sure to get into all the edges. Then, the hardest part: chilling! Cover the pie loosely with plastic wrap and refrigerate for at least 4-6 hours, or even better, overnight. This is crucial for it to set properly. I know, waiting is tough, but trust me, it’s worth it. That aroma of lime will start to fill your fridge, a promise of deliciousness to come.
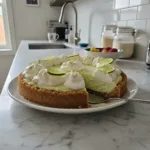
- Garnish and Serve Your No-Bake Key Lime Pie:: Once your No-Bake Key Lime Pie is perfectly set and firm, it’s time for the final touches! I love to garnish mine with a dollop of extra whipped cream, a sprinkle of fresh key lime zest, and maybe a few thin slices of lime for a pop of color. It just looks so inviting! Slice it with a sharp, warm knife for clean cuts. The first slice is always the best; a creamy, tangy, sweet bite that just screams summer. Enjoy every single refreshing piece!