Description
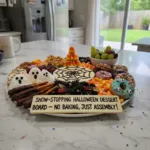
Create a Show-Stopping Halloween Dessert Board with spooky treats and no baking! Easy assembly for a fun, festive, and memorable spooky season spread.
Ingredients
- Spooky Sweets:
- Gummy Worms
- Candy Corn
- Chocolate Eyeballs
- Mini Cupcakes
- Ghost Peeps
- Frightful Fruits:
- Green Grapes
- Red Grapes
- Mandarin Oranges
- Sliced Apples (with lemon juice)
- Creepy Crunchies:
- Pretzel Sticks
- Dark Chocolate Cookies
- Ghost-Shaped Tortilla Chips
- Dipping Delights:
- Chocolate Hummus
- Caramel Dip
- Cream Cheese Frosting (tinted)
Instructions
- Gather Your Spooky Stash:: First things first, get all your treats out on the counter. Seriously, lay it all out. I find if I don’t see everything, I forget half of it. It’s like a pre-game huddle for your ingredients. Check those expiration dates, hon! I once put out some slightly stale cookies and, well, nobody was impressed. This step sets the stage for your amazing Show-Stopping Halloween Dessert Board.
- Pick Your Perfect Board:: Choose a large platter, cutting board, or even a baking sheet lined with parchment. The bigger the better, honestly, because you’re going to fill it up! I have this huge, rustic wooden board that usually holds cheese, but for Halloween, it becomes my spooky canvas. Don’t fret if it’s not ‘perfect’; a little character adds charm, right?
- Anchor Your Dips:: Place your small bowls of chocolate hummus, caramel dip, and tinted frosting on the board first. These are your anchors, the big pieces everything else will flow around. Think of them as the main attractions on your Show-Stopping Halloween Dessert Board. This is where I always forget to leave enough space around them, oops!
- Arrange the Main Treats:: Next, add your larger items like the mini cupcakes and ghost Peeps. Arrange them around the dips, creating little clusters. Don’t be afraid to overlap a bit; it makes it look abundant and inviting. I like to make little ‘paths’ between the different types of treats, like a spooky trail.
- Fill with Frightful Fruits & Crunchies:: Now for the grapes, mandarin oranges, apple slices, pretzel sticks, and dark chocolate cookies. Start filling in the bigger gaps. I always try to alternate colors and textures here. Like, a pile of green grapes next to dark cookies, then some bright orange mandarins. It really makes the Show-Stopping Halloween Dessert Board pop!
- Add the Creepy Crawlies & Finishing Touches:: Finally, sprinkle your gummy worms, candy corn, and chocolate eyeballs into all the remaining nooks and crannies. This is where the board really comes to life and gets that ‘Show-Stopping’ vibe. You want it to look overflowing and irresistible. I sometimes add a few plastic spiders for extra spookiness, but that’s optional, of course!